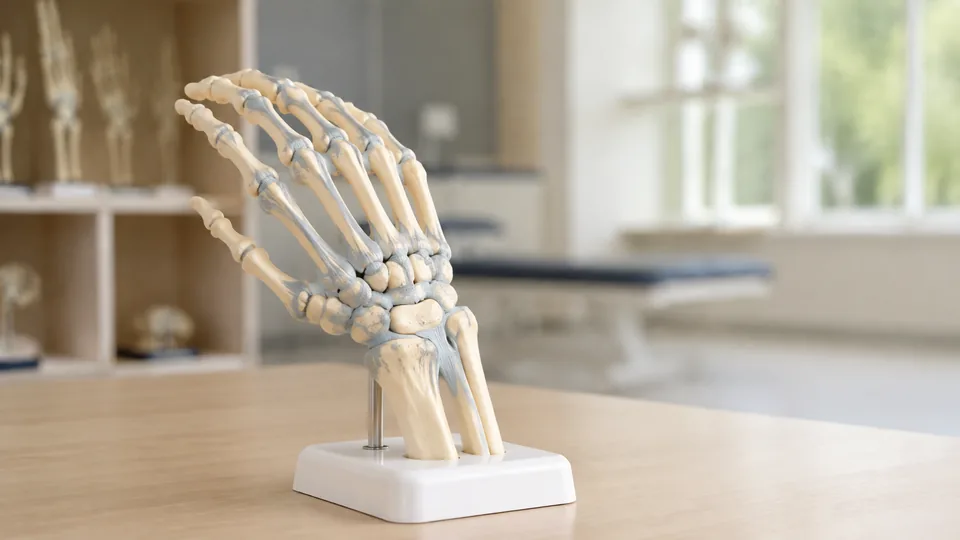
The wrist packs eight carpal bones, several joints, tendons, ligaments, nerves, and vessels into a space barely wider than a watchband. On a printed page, that crowded arrangement can look like a bowl of alphabet soup. A physical model lets a student rotate the hand, trace the radius and ulna into the carpals, or show a patient where the median nerve passes through the carpal tunnel.
Wrist anatomy models differ sharply in scope. Some display bones and flexible finger movement, while layered models expose muscles, tendons, nerves, and arteries. Larger upper-limb models add the forearm muscles that move the wrist, and full skeletons provide whole-body orientation. The common buying mistake is paying for detail that the learner does not need, or choosing a basic skeleton when soft-tissue relationships are the real lesson.
Different settings call for different tools. A medical student may value removable layers and a detailed manual, while an art student may prefer painted muscle origins and insertions. For focused hand and wrist study, the Axis Scientific Hand Anatomy Model offers the strongest balance of anatomical coverage and interactive construction among these nine picks.
Short on reading time? The highlights below point to the strongest choices before the full comparison.
Quick Answer
Best overall: The Axis Scientific Hand Anatomy Model combines bones, muscles, ligaments, nerves, and arteries in a seven-part format that supports serious spatial study. Best for carpal tunnel education: The GPI Anatomicals Hand and Wrist Model isolates clinically familiar wrist structures in a clear display format. Best affordable skeletal model: The LVCHEN Human Skeleton Hand Model provides life-size bones, flexible fingers, and a stable base without the complexity of soft tissues.
For a wider view, the JNMFTD Upper-Limb Muscle Model connects wrist movement to the forearm and arm. The magnetic seven-part hand model is another compelling choice for learners who expect to remove and replace anatomical layers frequently.
Best Wrist Anatomy Models Comparison Table
| Product | Best For | Anatomical Coverage | Interactive Feature |
|---|---|---|---|
| Axis Scientific Hand Anatomy Model | Overall hand and wrist study | Bones, muscles, ligaments, nerves, arteries | Seven removable parts |
| GPI Hand and Wrist Model | Carpal tunnel demonstrations | Median nerve, tendons, ligament, wrist bones | Focused display with information card |
| Magnetic Seven-Part Hand Model | Layer-by-layer learning | Superficial and deep hand structures | Magnetic removable components |
| JNMFTD Upper-Limb Muscle Model | Forearm and wrist muscle study | Arm, forearm, wrist, hand, vessels, nerves | Seven removable muscle components |
| EVOTECH Hand Skeleton Model | Muscle attachment study | Hand, wrist, distal radius and ulna | Painted origins and insertions |
| LVCHEN Skeleton Hand Model | Affordable bone study | Carpals, metacarpals, phalanges, distal forearm | Flexible wire articulation |
| MAYMII Hand Skeleton Model | Portable demonstrations | Hand, wrist, distal radius and ulna | Wire articulation and removable base |
| qzzXoq Six-Joint Model Set | Comparative joint teaching | Hand plus five other major joints | Flexible ligaments |
| Axis Scientific Life-Size Skeleton | Whole-body anatomical context | Full skeleton with articulated joints | Movable joints and rolling stand |
The detailed reviews below explain where each model shines and which compromises matter during study or teaching.
1. Axis Scientific Anatomy Model of Hand With Muscles and Ligaments: Best Overall

Dense anatomical relationships are the central challenge in wrist study, and this Axis Scientific model tackles that problem with seven removable parts. Bones provide the framework, while muscles, ligaments, nerves, and arteries show how soft tissues thread through the hand. Pulling away a component reveals structures that would otherwise sit buried beneath the surface, much like peeling back layers during a lab demonstration.
The model is handheld rather than fixed to a stand, which gives students freedom to tilt it under a desk lamp or pass it around a study group. A learner can follow a nerve from the wrist toward the fingers, then flip the model and compare palmar and dorsal relationships. The included full-color manual uses photographs of the actual model, a practical advantage when a numbered landmark leaves someone scratching their head.
Pros
- Shows bones, muscles, ligaments, nerves, and arteries together
- Seven removable parts expose deeper anatomical relationships
- Handheld construction supports close, interactive examination
- Hand-painted details help distinguish neighboring structures
- Includes a full-color manual with model photographs
Cons
- Lack of a stand makes it less convenient for permanent shelf display
- Greater complexity may exceed the needs of introductory bone identification
This is the strongest choice for medical, therapy, and anatomy students who need more than a row of white bones. Its layered design supports repeated review of how tendons, nerves, vessels, and muscles occupy limited space around the wrist. Buyers seeking a simple demonstration prop can spend less on a skeletal model, but serious visual learners are likely to appreciate the extra depth every time a diagram starts feeling flat.
To buy this product, click here.
2. GPI Anatomicals Hand and Wrist Model With Carpal Tunnel Syndrome: Best for Carpal Tunnel Education

For a focused explanation of the carpal tunnel, a sprawling upper-limb model can create more visual noise than clarity. This GPI model puts the median nerve, palmar carpal ligament, and flexor tendons at center stage. It also identifies relevant bones, including the triquetrum, pisiform, hamate, and hook of hamate, so the passageway has a clear skeletal context rather than floating in isolation.
The model sits on a display base and comes with an information card, making it especially practical in an office, classroom station, or patient-education area. Picture an instructor pointing from the distal radius and ulna toward the palm while explaining why so many structures compete for room at the wrist. That compact, topic-specific presentation keeps the visual conversation anchored to the anatomy being discussed.
Pros
- Provides a focused view of carpal tunnel anatomy
- Shows the median nerve and major flexor tendons
- Includes identifiable carpal bones and distal forearm structures
- Supplied with a display base for stable presentation
- Information card supports quick teaching references
Cons
- Narrow clinical focus offers less coverage of the complete hand musculature
- Display-oriented format is less interactive than a layered removable model
Educators explaining carpal tunnel anatomy will find this easier to navigate than models crowded with every superficial hand muscle and vessel. It is also well suited to healthcare offices where a clean, stable reference needs to remain ready on a desk. Students seeking broad dissection-style exploration should favor the Axis or magnetic seven-part model, while focused communicators will value the GPI model’s visual economy.
To buy this product, click here.
3. Medical Anatomical Hand Skeleton Model With Muscles, Ligaments, Nerves, and Blood Vessels: Best Removable Model

Repeated assembly can turn a useful anatomy lesson into a fiddly battle with tiny hooks or tight fittings. This life-size model uses magnets to mount its seven removable parts, allowing learners to move from superficial structures toward deeper layers with less fuss. The model represents muscles, tendons, ligaments, bones, and blood vessels, including superficial and deep palmar arterial arches.
Almost one hundred numbered landmarks are paired with a full-color manual, which gives independent learners a route through the dense detail. It rests on a wooden base with a stand, yet the hand can be taken off for close examination. That dual setup works nicely in a classroom: display it upright while explaining a structure, then lift it free and pass it to the front row for a closer look.
Pros
- Seven removable parts support layered anatomical study
- Magnetic mounting makes routine assembly straightforward
- Represents superficial and deep structures
- Includes nearly one hundred numbered landmarks and a color manual
- Can be displayed on its stand or removed for closer inspection
Cons
- Numerous landmarks can feel dense for beginners learning basic bones
- Removable pieces require organized storage during group sessions
This model makes sense for learners who expect to assemble and disassemble their study aid frequently. Its magnetic connections are the big attraction, especially in a busy lab where several students may handle the same model. Basic skeletal study does not require this much visual information, but layered soft-tissue work benefits from the ability to expose one relationship at a time.
To buy this product, click here.
4. JNMFTD Human Arm Anatomical Muscle Model: Best for Forearm and Wrist Muscles
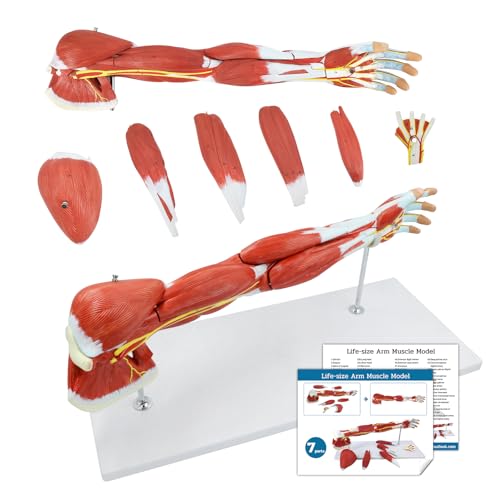
Wrist movement begins well above the wrist. The JNMFTD model follows that mechanical chain through the upper limb, showing the shoulder, arm, forearm, and hand instead of isolating the carpals. Its seven-part construction includes removable muscles such as the biceps, triceps, deltoid, and forearm components associated with wrist flexion and extension.
More than 200 numbered markers provide considerable reference depth across the muscles, arteries, and nerves represented on the model. Components are attached with metal screws, struts, and hooks, and the PVC model rests on a removable base. For a kinesiology student trying to understand why a tendon crossing the wrist has a muscle belly near the elbow, this broader view makes the anatomical chain click into place.
Pros
- Connects wrist anatomy with the forearm and upper arm
- Seven removable parts reveal important muscle relationships
- More than 200 numbered markers support detailed study
- Shows muscles alongside arteries and nerves
- Includes a display base and educational manual
Cons
- Larger scope takes more room than a dedicated hand model
- Offers less concentrated carpal detail than wrist-specific options
Fitness educators, artists, physical education students, and anatomy learners exploring movement may gain more from this model than from an isolated skeleton hand. It makes extension, flexion, and forearm muscle relationships easier to discuss because the relevant tissues remain connected within the upper limb. Buyers concentrating on individual carpal bones or the carpal tunnel should choose a more focused model.
To buy this product, click here.
5. EVOTECH SCIENTIFIC Hand Skeleton Model With Painted Muscle Insertions and Origins: Best for Muscle Attachments

White bones reveal shape, but they do little to explain where muscles pull. EVOTECH adds hand-painted origin and insertion areas to a life-size right-hand skeleton, giving artists and movement-focused students a visual bridge between skeletal landmarks and muscular action. The model includes the complete hand plus lower portions of the radius and ulna, so the wrist does not end abruptly at the carpals.
Stainless wire articulation permits movement during demonstrations, and the model arrives mounted on an ABS base. Imagine sketching a hand in tension and needing to understand why a particular bony prominence matters. The color markings create a quick visual cue without covering the skeleton in full molded muscles, preserving a clean view of bone contours while adding functional context.
Pros
- Painted muscle origins and insertions add functional context
- Life-size construction supports recognizable landmark study
- Includes distal portions of the radius and ulna
- Wire articulation allows movement demonstrations
- Comes with a base and detailed instruction guide
Cons
- Painted attachment areas do not show the three-dimensional bulk of muscles
- Wire articulation is less realistic than a model with represented ligaments
This is a smart middle ground between a plain skeleton and a costly layered muscle model. Art students, massage students, and introductory kinesiology learners can associate attachment areas with movement while keeping the underlying bones visible. Anyone needing nerves, vessels, or removable tissue layers should move toward the first or third pick, where soft-tissue relationships receive far more attention.
To buy this product, click here.
6. LVCHEN Human Skeleton Hand Model: Best Budget Pick

Simple can be wonderfully effective when the goal is naming bones. The LVCHEN model represents the eight carpals, five metacarpals, and fourteen phalanges in a life-size PVC format, along with the wrist ends of the ulna and radius. Flexible wire through the fingers allows basic positioning, helping a learner compare bone placement as the hand changes posture.
A sturdy display base keeps the model upright for a desk, classroom shelf, or study station. During a quick exam review, a student can point from the scaphoid region toward the thumb or count the phalanges without colorful vessels competing for attention. Its stripped-back appearance is precisely the appeal for foundational osteology, where clear contours matter more than elaborate layers.
Pros
- Life-size format provides an intuitive view of hand proportions
- Represents all eight carpal bones
- Flexible fingers support basic movement demonstrations
- Includes distal radius and ulna anatomy
- Mounted base keeps the model ready for display
Cons
- Does not represent muscles, ligaments, nerves, or vessels
- Flexible wire demonstrates positioning rather than true joint mechanics
Beginners, artists studying bony proportions, and teachers needing a straightforward prop should place this high on the list. It delivers the essential skeletal map without demanding that learners decode dozens of numbered soft tissues. Advanced students working through tendon compartments, ligament attachments, or neurovascular passages will outgrow its intentionally basic scope.
To buy this product, click here.
7. MAYMII PVC Human Hand Skeleton Model: Best Portable Skeletal Model

The MAYMII hand skeleton is built around portability and direct manipulation. Its life-size PVC bones are held together with wire, allowing students to flex and position the hand while observing the carpals, metacarpals, phalanges, and distal forearm. The model can stay upright on its white base during a lesson, then come off the stand when a closer angle is needed.
That removable base is useful in small-group teaching. An instructor can begin with the model facing the class, lift it free, and hand it to a student who needs to inspect the thumb side of the wrist. The hand-painted, skeletal design remains uncluttered, making it suitable for identifying major bone structures without the visual buzz of arteries and muscles.
Pros
- Life-size hand and wrist proportions support foundational study
- Shows the distal ulna and radius
- Wire construction allows flexible positioning
- Detachable base supports display and handheld use
- PVC construction keeps the model relatively lightweight
Cons
- Provides no represented soft-tissue anatomy
- Wire-connected bones offer limited simulation of natural ligament motion
Students who carry models between a dorm desk, classroom, and tutoring session may appreciate the option to separate the hand from its base. Its purpose overlaps with the LVCHEN model, though the detachable mounting gives MAYMII a practical edge for handheld demonstrations. Learners studying clinical wrist spaces or muscle mechanics will need a richer model alongside it.
To buy this product, click here.
8. qzzXoq Human Joint Model Anatomy Set: Best for Comparative Joint Teaching

Sometimes the wrist makes more sense beside other joints. This six-piece set includes hand, foot, hip, knee, shoulder, and elbow models, allowing an educator to compare joint shapes and ligament arrangements across the body. Flexible ligaments permit bending, which brings more structural context than a wire-only skeletal hand.
The models use lightweight, corrosion-resistant PVC, a practical material for moving multiple pieces between lab tables. During a survey anatomy class, students might place the hand beside the foot and compare their clusters of small bones, then shift attention to the larger architecture of the knee or hip. That broad perspective makes the set useful where wrist anatomy is one stop in a larger joint curriculum.
Pros
- Includes hand, foot, hip, knee, shoulder, and elbow models
- Flexible ligaments allow joint positioning
- Supports side-by-side comparison of major joints
- PVC construction is lightweight and corrosion resistant
- Well suited to broad classroom anatomy instruction
Cons
- The wrist receives less concentrated detail than on a dedicated hand model
- Six separate models require more storage and display space
This set offers the clearest value to teachers, training rooms, and students taking a broad musculoskeletal course. Buying six joints for a wrist-only lesson would be excessive, but comparative anatomy turns the extra pieces into a genuine advantage. For close study of nerves, vessels, or individual muscle layers, the set lacks the specialized detail of the higher-ranked hand models.
To buy this product, click here.
9. Axis Scientific Life-Size Skeleton Model: Best Full-Body Context

A dedicated hand model is ideal for a tight close-up, while a complete skeleton answers the bigger question: where does the wrist sit within the body’s entire mechanical framework? This approximately 5-foot-6-inch Axis Scientific skeleton represents 206 bones and articulated major joints. It supports demonstrations of flexion, extension, abduction, and other movements across multiple regions.
Three study resources accompany the skeleton, including a product manual, a skeletal terminology guide, and a numbering guide with 189 stickers for active recall. A pelvis-mounted rolling stand lets instructors reposition the model across a classroom without carrying it, while the included dust cover helps during storage. Students can begin at the shoulder, track the radius and ulna down the forearm, and finish at the hand in one uninterrupted sweep.
Pros
- Provides complete skeletal context for the wrist and upper limb
- Life-size construction supports room-wide demonstrations
- Articulated joints permit broad movement instruction
- Includes three study resources and 189 numbering stickers
- Rolling stand and dust cover support classroom use
Cons
- Requires substantially more floor space than a hand model
- Individual wrist structures are less accessible than on a dedicated close-up model
This skeleton belongs in a classroom, studio, or training space where wrist anatomy forms part of full-body instruction. It is far more model than a learner needs for memorizing carpals at a kitchen table, yet its scale has real teaching presence. Choose it for anatomical orientation and movement across regions, then pair the lesson with diagrams or a focused model whenever tiny wrist landmarks become the priority.
To buy this product, click here.
How to Choose a Wrist Anatomy Model
Match the Anatomical Detail to the Lesson
Start with what must be visible. For bone identification, a life-size skeleton hand showing the carpals, metacarpals, phalanges, radius, and ulna is usually sufficient. Clean white contours reduce distraction during a rapid study session, especially when someone is still learning which side of the wrist contains the thumb.
Soft-tissue study demands more. Models with muscles, tendons, ligaments, nerves, and arteries make crowded passages easier to visualize, while removable layers reveal structures hidden beneath the surface. A carpal tunnel demonstration benefits from a visible median nerve and flexor tendons, whereas a movement lesson may call for the forearm muscles that cross the wrist.
Decide Between Articulation and Removable Parts
Articulation and disassembly serve different purposes. Wire-mounted fingers can demonstrate general hand positions, but wire does not reproduce every natural joint constraint. Flexible represented ligaments add a more informative view of what holds bones together, while removable muscle layers prioritize internal spatial relationships.
For repeated assembly, magnetic components offer welcome convenience. Traditional hooks, screws, and struts can hold pieces securely, though they may require more deliberate alignment. In a bustling classroom where parts travel from hand to hand, easy reassembly and organized storage can matter almost as much as the painted detail.
Look for Useful Scale and Mounting
Life-size hand models are easy to relate to the learner’s own anatomy. A student can hold a model beside their wrist and compare proportions without mentally converting a reduced scale. Larger upper-limb and full-skeleton models add teaching presence, but they also consume desk or floor space.
A fixed base works well for a permanent office display, while a removable stand combines shelf stability with handheld access. Full skeletons need a sturdy mobile stand for practical classroom movement. Before ordering, picture the model in its real destination: a crowded dorm desk, a clinic shelf, or a lab where twenty students need a clear view.
Use Labels and Manuals Wisely
Numbered landmarks can turn a model into an active-recall tool. Cover the manual, identify each marker, then check the answer. Detailed models may carry close to one hundred or more reference points, which is excellent for advanced study but visually intense for a beginner.
A photographic manual is particularly useful because its angles and colors correspond to the physical model. Painted origins and insertions serve a different learning style, helping users connect muscles to specific bony areas. Neither approach is automatically superior. The right one depends on whether the lesson centers on naming structures, understanding movement, or tracing layered anatomy.
Balance Durability With Fine Detail
PVC is common because it is relatively lightweight, sturdy, and suitable for repeated educational handling. Fine projections and removable pieces still deserve careful treatment. A tiny anatomical landmark can be delicate regardless of the broader model’s material, so tossing loose parts into a drawer is a recipe for frustration.
Shared teaching models should have an assigned storage location and a simple parts check after each session. A dust cover helps with a full skeleton, while a compartmented container can keep removable hand layers together. Good storage preserves both the model and the next learner’s patience.
Best Wrist Anatomy Models FAQ
Which Wrist Anatomy Model Is Best for Medical Students?
A layered model showing bones, muscles, ligaments, nerves, and vessels is usually the most versatile. The Axis Scientific seven-part hand model fits that role well because removable components reveal deeper relationships, and its photographic manual supports structured review. Course requirements should guide the final choice, since some modules focus primarily on osteology.
Is a Life-Size Model Better Than a Miniature Model?
Life-size models make proportions and spatial relationships easier to interpret, particularly around the compact carpal region. Miniature models save room and can provide general orientation, but very small landmarks become harder to distinguish. For detailed wrist study, life size is generally the more practical format.
Do I Need Muscles and Ligaments on a Wrist Model?
That depends on the learning objective. A skeletal model works well for identifying carpals and studying basic hand proportions. Muscles and ligaments become valuable for understanding movement, stability, attachment points, and relationships between soft tissues and bone.
What Should a Carpal Tunnel Model Show?
A useful educational model should clearly represent the median nerve, the ligament forming the roof of the tunnel, relevant flexor tendons, and surrounding carpal anatomy. The GPI model concentrates on these relationships, making it easier to explain the confined space without unrelated upper-limb structures drawing attention away.
Are Flexible Fingers Anatomically Realistic?
Flexible wire helps demonstrate positioning and lets learners view bones from different angles. It should be treated as an educational approximation rather than a complete simulation of joint mechanics. Models with represented ligaments provide more context about joint restraint, though they also simplify living anatomy.
Are Removable Anatomy Models Worth the Added Cost?
They can be for students studying layered soft tissues. Removing a muscle or palmar layer exposes structures that are difficult to understand from the surface, turning a memorization exercise into a spatial lesson. A beginner who needs only bone names may receive better value from a basic articulated skeleton hand.
Can a Wrist Anatomy Model Be Used for Patient Education?
Yes, an appropriate model can help explain general anatomical locations in a clear visual format. Focused display models are especially convenient for this purpose. They remain educational aids and do not replace individualized evaluation, diagnosis, or guidance from a qualified healthcare professional.
How Should Removable Model Parts Be Stored?
Keep every component dry, supported, and together in a labeled container. Avoid forcing pieces during reassembly, and follow the supplied manual when alignment is unclear. For shared classroom models, counting the components after each lesson prevents a small removable layer from quietly disappearing beneath a stack of books.
Final Verdict
Among these nine options, the Axis Scientific Anatomy Model of Hand With Muscles and Ligaments is the strongest overall wrist anatomy model. Its seven removable parts, broad soft-tissue coverage, and photographic manual make it useful beyond basic bone identification. It suits students who need to see how muscles, ligaments, nerves, arteries, and skeletal structures share an exceptionally tight anatomical space.
The GPI Anatomicals Hand and Wrist Model is the sharper choice for focused carpal tunnel education, while the LVCHEN Skeleton Hand Model offers a straightforward route into life-size bone study. Learners concentrating on forearm-driven wrist movement should look toward the JNMFTD upper-limb model, and instructors covering several joints may get more teaching range from the qzzXoq set. Before purchasing, match the model to the lesson, check where it will be stored, and decide whether removable layers, articulation, or clean skeletal visibility will earn the most use once the studying begins.
