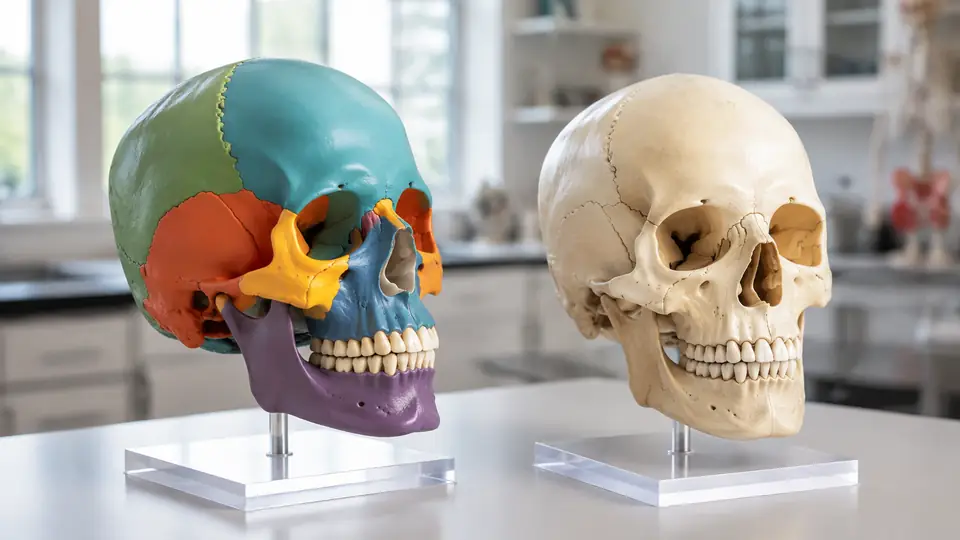
On a color-coded skull, the sphenoid might blaze yellow behind the eye sockets while the temporal bones sit in bright blue on either side. Set a natural-finish skull beside it and the same anatomy becomes a quiet landscape of ivory surfaces, hairline sutures, ridges, pits, and foramina. Both models may represent the same bones with comparable accuracy, yet they ask the learner to look in very different ways.
The practical difference in color-coded vs natural skull models is not simply bright versus plain. Color-coded models emphasize boundaries and identification, while natural models emphasize realistic appearance, subtle landmarks, and the uninterrupted form of the skull. Neither approach is universally superior. Their usefulness depends on whether the lesson is about naming bones, tracing relationships, recognizing landmarks, or preparing to work with less visually simplified anatomy.
What “Color-Coded” and “Natural” Actually Mean
A color-coded skull model uses contrasting paint or molded colors to distinguish anatomical regions. Most often, each cranial and facial bone receives its own color, or paired bones share a color. The zygomatic bones may be green, for example, while the maxillae are orange and the frontal bone is blue. That sharp visual separation turns an intricate suture line into a border that can be followed without squinting under a desk lamp.
Not every colored skull uses color for the same purpose, however. Some models color the individual bones, while others use painted areas to represent muscle origins and insertions. A model covered in red and blue patches may therefore be teaching muscular attachment sites rather than bone boundaries. Manufacturers do not follow one universal anatomical color standard, so yellow does not reliably mean “sphenoid” across different model lines or classrooms.
A natural skull model generally has a bone-like white, cream, or pale ivory finish. “Natural” describes its appearance, not its material. Educational versions are commonly synthetic replicas rather than real human bone, and the shade or surface texture may be stylized. Some have darker suture lines, numbered landmarks, or lightly painted teeth while still being classified as natural-finish models.
Consider a student trying to find the palatine bone for the first time. On a colored model, a small contrasting patch at the back of the hard palate practically announces itself. On an all-ivory skull, the student must identify the transverse palatine suture and work out which surface belongs to which bone. The first encounter feels friendlier in color, but the second demands closer anatomical reading.
The Main Differences at a Glance
| Attribute | Color-Coded Skull | Natural-Finish Skull |
|---|---|---|
| Primary visual emphasis | Boundaries between bones or designated anatomical regions | Overall form, surface landmarks, and bone-like appearance |
| Early bone identification | Usually more direct because adjacent bones contrast | Requires greater reliance on sutures, position, and shape |
| Realistic visual presentation | More abstract and diagram-like | Closer to the appearance of an uncolored skeletal specimen |
| Suture study | Borders are conspicuous, although paint can dominate subtle detail | Suture morphology can receive more attention if molding is clear |
| Landmark study | Useful, but strong colors may pull attention toward whole bones | Encourages attention to processes, fossae, foramina, and ridges |
| Color conventions | Not universally standardized | Color associations are generally irrelevant |
| Classroom visibility | Contrasting regions are easier to distinguish from across a room | Fine boundaries may be harder to see at demonstration distance |
| Typical study challenge | A learner may memorize colors instead of anatomy | Adjacent bones may blend together for a beginner |
These differences concern the visual treatment, not necessarily the model’s construction quality. Either type may have a removable calvaria, detachable mandible, exposed cranial cavity, numbered landmarks, spring-mounted jaw, or magnetic connections. A brightly colored skull is not automatically more detailed, and a creamy natural finish does not guarantee realistic sutures or crisp foramina.
Where Color Coding Helps Most
Learning the Bones and Their Boundaries
Color is particularly useful when the skull still feels like a dense white puzzle. The adult human skull is commonly described as having 22 bones when the six auditory ossicles and the hyoid bone are excluded: eight cranial bones and 14 facial bones. Contrasting regions help a beginner separate broad bones such as the frontal and parietal bones from smaller, less obvious contributors around the orbit, nasal cavity, and hard palate.
During a lab review, an instructor might point to the orbit and ask which bones form its walls. On a well-segmented colored model, students can follow several adjoining colors through a space that otherwise looks like one smooth, shadowy socket. The frontal, sphenoid, zygomatic, maxilla, ethmoid, lacrimal, and palatine bones all contribute to the orbit, although some contributions are small. Color gives those slivers enough visual punch to begin mapping the relationship.
The same advantage appears at the skull base, where irregular bones interlock like rocky coastlines. A learner tracing the sphenoid can follow its body and wings without losing the bone among neighboring temporal, frontal, ethmoid, and occipital structures. That continuity is valuable because the sphenoid is not a neat plate. It occupies the central cranial base and contributes to several regions, including the orbits.
Teaching From Across a Classroom
Contrast also earns its keep during demonstrations. From the back row, a delicate coronal suture on a pale model may disappear under glare, while a blue frontal bone meeting two orange parietal bones remains obvious. The instructor can rotate the skull, point to the junction, and keep the room oriented without everyone crowding around the table.
In a tutoring session, a learner may repeatedly confuse the maxilla with the zygomatic bone. Asking the learner to touch the orange area, then trace where it forms the upper jaw, part of the orbit, and part of the hard palate creates a coherent spatial story. Yet that exercise should eventually continue without the orange cue, or the paint risks becoming a crutch.
Understanding That Bones Extend Beyond One View
Textbook illustrations often change color palettes from page to page, which can make a winding bone seem oddly disconnected. A physical color-coded skull preserves the same region as it turns from anterior to lateral, inferior, and internal views. Follow the temporal bone around the ear region, under the cranial base, and toward the cranial cavity, and its irregular three-dimensional extent becomes much less slippery.
A second useful drill starts with the skull facing forward. The learner identifies a bone, closes their eyes while the model is rotated, and then finds the same colored bone from below or behind. Color provides the first breadcrumb trail, while the rotation introduces the spatial challenge that a flat illustration cannot fully reproduce.
Where a Natural Finish Has the Advantage
Reading Sutures Instead of Following Paint
A natural model removes the loudest hint. To locate the parietal bone, the learner must recognize its position between the coronal, sagittal, lambdoid, and squamous sutures rather than recalling that it was purple. This kind of identification feels slower and occasionally frustrating, but it shifts attention toward anatomical relationships that remain meaningful when the classroom color scheme disappears.
Suppose an exam image shows an uncolored superior view of the skull. A student who studied only by saying “the green part is parietal” may hesitate. Another student who practiced tracing the sagittal suture down the midline and the coronal suture across the anterior border has more durable location cues to work with. The pale model makes that transition unavoidable.
Natural models can also make the suture itself the star. If the casting reproduces the serrated, interlocking appearance clearly, the learner can examine how a suture differs from a smooth artificial color boundary. Surface quality matters here. A poorly molded natural skull with faint seams may be less educational than a sharply detailed colored one.
Focusing on Processes, Fossae, and Foramina
Not every important skull feature follows a bone boundary. The mastoid process, styloid process, mandibular fossa, sella turcica, mental foramen, optic canal, and foramen magnum are landmarks located on or within bones. On a subdued model, the eye is less tempted to stop at colored territories and more likely to notice the tiny hole, shallow depression, or pointed projection under a fingertip.
A learner reviewing the inferior skull might run a probe gently from the hard palate toward the pterygoid processes and then back to the occipital condyles. None of that route depends on bright segmentation. Shape, direction, and neighboring structures carry the lesson, much as they do in an atlas photograph or an uncolored specimen.
The same applies to dental and jaw relationships. When the mandible closes beneath the maxilla, the visual story concerns the dental arches, mandibular ramus, coronoid process, condylar process, and temporomandibular region. A natural finish keeps that silhouette calm and coherent, although the model’s articulation determines how much movement can actually be demonstrated.
Presenting Anatomy Without a Diagram-Like Palette
Natural-finish skulls often suit settings where a neutral appearance is desirable, such as a consultation room, an art studio, or a general anatomy display. An artist studying cheekbone projection may prefer ivory surfaces because reflected light reveals planes and shadows without red, green, and blue patches interrupting the form. The skull reads as a single structure first, then as a collection of bones.
Likewise, an instructor discussing overall cranial proportions may want students watching the profile rather than chasing color borders. The forehead’s contour, the projection of the facial skeleton, and the angle of the mandibular ramus remain visually uninterrupted. Color is wonderful at separating parts, but sometimes the whole deserves the spotlight.
Color Can Teach Anatomy, or Accidentally Replace It
The largest limitation of a color-coded model is cue dependence. If the occipital bone is always yellow during practice, “yellow” may become the first fact retrieved and “posterior-inferior cranium surrounding the foramen magnum” the second. Because color assignments vary among manufacturers, that shortcut may collapse as soon as a different model appears.
This does not make color coding bad. It means the cue should be deliberately faded. A beginner could first name bones with the colors visible, then cover selected regions with removable paper labels, use grayscale photographs, or switch to an unlabeled natural model. Each step turns down the visual volume while preserving the spatial map underneath.
Natural models have the opposite problem. Their subtlety can bury small boundaries before the learner has enough context to recognize them. Someone staring into the medial orbit may see a cream-colored maze rather than the delicate lacrimal and ethmoid contributions. An atlas diagram or temporary removable marker can supply orientation before the learner returns to the plain surface.
Accuracy still outranks palette. Paint that spills across a suture can misrepresent a boundary, while thick coating may soften shallow grooves or tiny openings. On a natural model, fused-looking seams or blocked foramina create similar trouble. Color and realism are teaching formats. They cannot compensate for unclear molding or anatomically misleading construction.
A Strong Study Method Uses Both Visual Languages
When both finishes are available, they work well as a sequence rather than as rivals. The colored skull introduces the map, and the natural skull tests whether the map survives without bright borders. That progression resembles learning a subway system with colored lines, then navigating the streets above using intersections and landmarks.
- Orient the skull first. Identify anterior, posterior, superior, inferior, lateral, and medial views. Check the orbits, nasal aperture, external acoustic meatus, hard palate, and foramen magnum before naming individual bones.
- Trace one bone through multiple views. Follow its complete visible extent rather than tapping one familiar patch. Describe which bones border it and which cavities or openings it helps form.
- Name landmarks on that bone. Move beyond “temporal bone” to structures such as the mastoid process, styloid process, mandibular fossa, and external acoustic meatus where the model depicts them clearly.
- Remove the color cue. Use a natural model, an uncolored photograph, or a grayscale atlas image. Identify the same bone from shape, position, sutures, and neighbors.
- Reverse the question. Instead of asking “What is this bone?” ask “Which bone contains this foramen?” or “Which bones contribute to this cavity?” This exposes shallow color memorization quickly.
During solo study, one learner might point to every opening on the cranial base and say its name aloud, then check an atlas because models vary in how finely small canals and foramina are reproduced. In a study pair, one person can call out “find the lacrimal bone without using its color,” while the other explains its position on the medial orbital wall. Saying the relationship aloud adds a useful layer beyond silent recognition.
Another exercise compares left and right sides. Paired bones are often assigned the same color, so the learner must use orientation words rather than color alone: right zygomatic bone, left mandibular foramen, medial wall, lateral surface. That little verbal adjustment sounds modest, yet it builds the directional vocabulary needed for more complicated anatomy.
Features That Matter Independently of the Finish
The phrase “color-coded vs natural” describes appearance, not the model’s entire educational scope. Two skulls with different finishes may otherwise be constructed identically, while two ivory skulls may differ dramatically in what opens, moves, or separates. Before drawing conclusions from the paint, check what the model is designed to demonstrate.
- Removable calvaria: A detachable skullcap exposes the cranial cavity and internal cranial base, allowing structures such as the cranial fossae and sella turcica to be viewed more directly.
- Movable or removable mandible: This can reveal the mandibular fossae, inferior facial skeleton, and inner surface of the mandible. A spring-mounted jaw usually demonstrates position and limited motion rather than reproducing the full biomechanics of the living temporomandibular joint.
- Numbered landmarks: Numbers support reference-guide exercises, although they may clutter the surface or become another recognition cue.
- Clearly formed foramina and canals: Crisp openings matter when studying routes through the skull, but model detail varies and should be checked against an anatomical reference.
- Disarticulation: A disarticulated skull separates into individual bones, offering a different level of study from a one-piece or three-part articulated model.
- Scale: Life-size models support familiar proportions, while enlarged regional models may reveal structures that are difficult to inspect on a standard skull.
For instance, a class focused on the internal cranial base gains little from perfect external coloring if the calvaria cannot be removed. Meanwhile, someone studying individual bone shape may learn more from separable components than from any assembled palette. The lesson determines which construction feature carries the most weight.
Model terminology also deserves a careful read. “Three-part skull” commonly refers to a skullcap, cranial base, and mandible, but exact assembly methods and included details can vary. “Twenty-two-part” often signals separable cranial and facial bones, yet manufacturers may count or group components differently. The product documentation, not the finish alone, defines what can actually be handled.
Keeping Painted and Natural Surfaces Legible
Dust settles into sutures and around the teeth surprisingly fast, softening the crisp little shadows that make landmarks readable. A soft, dry brush or microfiber cloth is generally a cautious starting point, but the manufacturer’s care instructions should govern cleaning because plastics, paints, printed numbers, adhesives, magnets, and hardware differ.
For a classroom model passed through many hands, gentle handling matters as much as cleaning. Pull removable parts from their intended grip points rather than tugging a thin styloid process or delicate orbital edge. Rings, pens, and metal probes can scratch paint or leave gray streaks across a pale finish, so a blunt plastic pointer is often the quieter companion.
A student may be tempted to draw suture names directly onto a natural skull with permanent marker. That satisfying first line can become an irreversible purple smear, depending on the surface. Use removable labels only when their adhesive and ink are known to be compatible, and test any temporary marking method on an inconspicuous area if the manufacturer permits it.
Storage should protect both versions from hard impacts, sustained pressure on projecting structures, excessive heat, and prolonged strong sunlight. Painted areas may fade or discolor, while pale plastics can also change appearance over time. Keeping detachable pieces together in a padded container prevents the classic lab-table mystery of a skull with a missing mandible.
Common Questions About Skull Model Finishes
Are Color-Coded Skull Models Less Anatomically Accurate?
Not inherently. Color coding is a visual overlay and does not determine whether the bone shapes, sutures, landmarks, and openings are accurate. Bright colors are intentionally unrealistic, but a colored model can still have excellent anatomical detail. Conversely, a realistic ivory finish can cover a simplified or poorly molded structure.
Do Skull Bone Colors Have a Standard Meaning?
No universal palette governs educational skull models. One manufacturer may color the frontal bone blue while another uses yellow, and classroom diagrams may use still another scheme. Learn the bone’s shape, location, articulations, and landmarks rather than treating a particular color as part of its anatomical identity.
Is a Natural Skull Model Made From Real Bone?
Usually not. In model terminology, “natural” commonly refers to a bone-colored finish. Human skeletal material is subject to ethical, legal, institutional, and provenance considerations, so an item should never be assumed to be real bone based on color or texture. The material description should state whether it is synthetic or an actual specimen.
Can One Skull Model Show Both Approaches?
Some educational designs combine a natural base color with highlighted sutures, numbered structures, or selected painted regions. Others may color one side and leave the opposite side relatively natural. Such hybrids can bridge identification and landmark study, although the exact meaning of every painted area must be checked in the supplied key.
Which Finish Is Better for Beginners?
Color coding usually reduces the first hurdle of separating adjacent bones, particularly around the orbit and cranial base. A natural finish then becomes useful for removing that cue and practicing identification from form and location. When only one is available, an atlas can provide the missing visual language: colored diagrams can support a natural model, while uncolored images can challenge a colored one.
Match the Finish to the Lesson
Color-coded skulls excel at revealing the skull’s patchwork construction. They help learners follow irregular bones through crowded regions, and their contrast carries well in classroom demonstrations. Natural skulls quiet the palette, directing attention toward sutures, contours, processes, fossae, and foramina without an artificial color map doing the first step.
The most productive distinction is therefore not “easy model versus advanced model” or “educational versus realistic model.” It is boundary emphasis versus landmark emphasis. Use color to establish where bones begin and end, then practice without it until position, shape, and neighboring structures provide the answer. When the paint stops being necessary, the anatomy itself has finally taken center stage.
