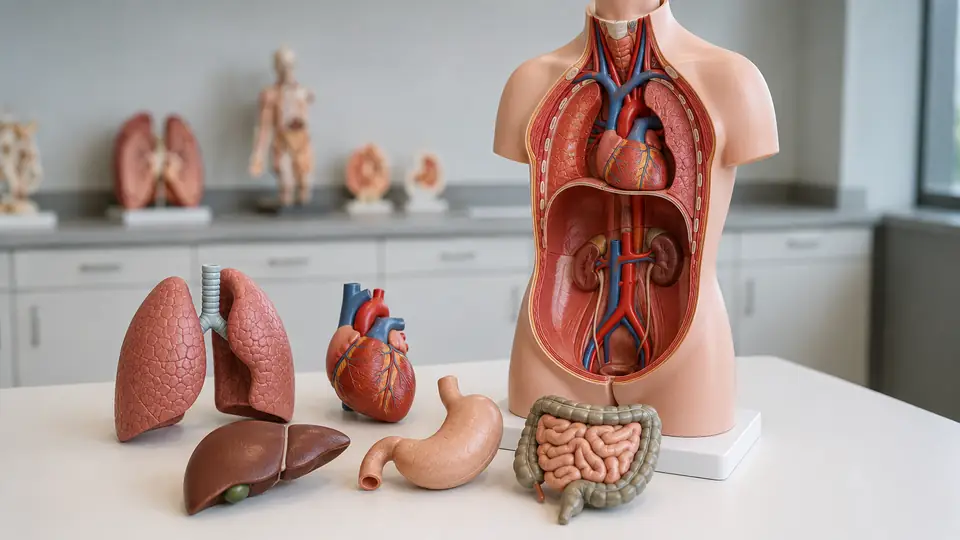
Learning the names of organs is one task. Understanding how those organs sit beside, behind, above, and within one another is a different challenge entirely. That is where how to study organ relationships with a torso model becomes useful. A three-dimensional model lets you examine the heart between the lungs, the liver beneath the diaphragm, and the kidneys toward the posterior abdominal wall instead of trying to reconstruct every relationship from a flat page.
The goal is not to memorize a plastic arrangement as though it were a perfect copy of the body. Torso models simplify anatomy, and some leave out structures or exaggerate others for visibility. Used alongside an atlas, textbook, or digital reference, however, a torso model gives spatial anatomy a physical shape that you can rotate, inspect, and test from several directions.
Start With Orientation Before Naming Organs
Before identifying individual organs, establish the model’s orientation. Place it in the anatomical position if its design allows, with the front facing you, the head end superior, and the feet end inferior. Then identify the anterior surface, posterior surface, right side, left side, medial area, and lateral edges. This small pause prevents a surprisingly common problem: memorizing a structure’s name while losing track of where it sits in the body.
For example, a learner studying the kidneys from the front may remember that they lie on either side of the vertebral column, but the model also shows that they are posterior to most of the abdominal organs. Someone examining the heart may notice its position between the lungs, then rotate the torso and see how close it is to the thoracic spine. Orientation turns isolated labels into relationships, and those relationships are what you should keep asking about next.
Use Anatomical Directions Out Loud
Describe each structure with directional language rather than relying only on pointing. Say, “The trachea is superior to the heart,” “The lungs are lateral to the mediastinum,” or “The stomach is inferior to the diaphragm.” If you are studying with a classmate, have that person ask for a relationship without allowing you to touch the organ first.
A short verbal drill can feel almost comically simple. Hold the liver in view and describe its position relative to the diaphragm, stomach, right kidney, and gallbladder. Then turn the torso and repeat the exercise from the posterior side. If your description changes because the viewing angle changed, that is useful feedback. The body did not move. Your mental map did.
Map the Torso by Regions and Cavities
Once orientation is secure, divide the torso into broad anatomical regions. Start with the thoracic cavity, then move to the abdominal cavity and pelvic region if the model includes them. The diaphragm is an especially useful landmark because it separates the thoracic cavity from the abdominal cavity while also explaining why the lungs and abdominal organs occupy different compartments.
Imagine a student tracing the rib cage with one finger before looking at the heart and lungs. That sequence establishes the boundary of the thorax first, so the organs are not floating in empty space. Another learner might begin at the pelvis and work upward, noticing how the digestive and urinary structures extend through different regions. Either route works when the learner consistently links each organ to the cavity or region that contains it.
| Study Area | Relationships to Examine | Useful Question |
|---|---|---|
| Thorax | Heart, lungs, trachea, esophagus, diaphragm | Which structures are central, lateral, anterior, or posterior? |
| Upper Abdomen | Liver, stomach, spleen, pancreas, gallbladder | Which organs lie beneath the diaphragm, and which are tucked behind others? |
| Lower Abdomen | Small intestine, large intestine, kidneys, ureters | Which structures are anterior, posterior, or positioned along the abdominal wall? |
| Pelvis | Bladder, rectum, reproductive organs when included | How do the pelvic organs relate to one another within a confined space? |
These broad areas provide a mental framework before you concentrate on smaller structures. A torso model may show the spleen, pancreas, or adrenal glands in a way that is difficult to see in a crowded illustration, but the larger regional map tells you where to search and why the structure belongs there.
Study Organ Relationships in Layers
Do not treat every visible organ as equally exposed. Many relationships become clearer when you study the torso in layers, moving from the outer framework toward deeper structures. Begin with the rib cage, sternum, and vertebral column if they are visible. Add the diaphragm, then examine the organs within each cavity. This layered approach mirrors the way anatomical position is often described, from superficial structures toward deeper ones.
With the thorax, start by locating the lungs and heart. Next, identify the trachea and major bronchi, then look for the esophagus and the relationship of these structures to the vertebral column. In the abdomen, inspect the liver and stomach first, then search for the pancreas, duodenum, kidneys, and other deeper structures. A learner who removes the liver from a detachable model may suddenly see why the stomach and gallbladder are easier to understand when their surrounding structures are temporarily out of the way.
Use Removable Parts as a Question, Not Just a Feature
If the model includes removable organs, do not simply take everything apart and name the pieces. Remove one component at a time and ask what its absence reveals. Removing the heart may expose the position of the lungs or the central structures of the mediastinum. Removing the liver may make the gallbladder, stomach, and upper abdominal relationships easier to inspect.
Try a two-pass routine. During the first pass, identify the organ and describe its neighbors while all major components remain in place. During the second, remove selected parts and repeat the description. If a removable kidney is taken out, for instance, trace where the ureter begins and where it travels inferiorly. The empty space is not the lesson by itself. The lesson is the relationship that becomes visible because the space has changed.
Trace Systems Through the Torso
Organ relationships become more meaningful when you follow a system rather than studying each organ as an isolated object. Choose one pathway and trace it with your eyes or a pointer. For the respiratory system, follow air from the nasal region if shown, through the pharynx and larynx, into the trachea, bronchi, and lungs. For the digestive system, follow the route from the esophagus to the stomach, small intestine, and large intestine.
A student may know the digestive organs in order but still struggle to understand how the liver, gallbladder, and pancreas connect to digestion. A torso model encourages a different question: where do their ducts or openings meet the digestive tract? Depending on the model’s detail, those connections may be simplified or only partially represented, so confirm fine anatomy in a reference image rather than assuming every molded groove is a complete pathway.
System tracing also works for the urinary tract. Locate the kidneys, follow the ureters inferiorly, and find the bladder. Then compare that route with the posterior placement of the kidneys and the more anterior position of the abdominal organs. A quick tracing exercise can expose a weak point in your mental map much faster than rereading a paragraph of labels.
Practice From Multiple Views
Rotate the torso and repeat the same identification task from the anterior, lateral, and posterior views. A front view may make the heart and liver easy to identify, while a posterior view clarifies the kidneys, vertebral column, and the position of several deeper structures. Side views are useful for judging depth, especially when one organ overlaps another in the frontal view.
Try covering the model’s label panel or turning it away from you. Point to a structure from the front and name it. Then state what lies behind it, what lies above it, and what lies lateral to it. For example, the liver is large and anterior in the upper abdomen, but the posterior view helps you consider its relationship to the right kidney and nearby vessels. The exact visibility depends on model construction, which is why the exercise should be treated as spatial practice rather than a substitute for dissection or detailed imaging.
Use a Blank Diagram After the Three-Dimensional Exercise
After working with the physical model, draw a quick two-dimensional sketch from memory. It does not need to be beautiful. Mark the diaphragm, heart, lungs, liver, stomach, kidneys, and intestines, then add directional notes such as anterior, posterior, superior, or inferior.
This reveals whether you truly understand the structure or merely recognized it when it was in front of you. If the stomach appears too low in your drawing or the kidneys drift to the front of the abdomen, return to the torso and check the relationship from another view. The model provides the three-dimensional reference, while the sketch tests whether you can reconstruct that reference independently.
Turn Observation Into Active Recall
Repeatedly reading labels creates familiarity, but familiarity is not the same as retrieval. Use the torso model to ask yourself questions before looking at the answer. Cover labels, remove a component, point randomly, or have someone name a relationship and ask you to identify the structures involved.
- Which organ lies immediately inferior to the diaphragm on the right side?
- Which structures surround or flank the heart?
- Where are the kidneys in relation to the vertebral column?
- What lies posterior to the abdominal organs that are most visible from the front?
- Which organs belong to the digestive tract, and which support digestion without forming the tract itself?
Give yourself time to answer before checking. If you miss a question, avoid simply rereading the label. Reorient the model, locate the neighboring landmarks, and explain the relationship again in your own words. One short session might involve five questions about the thorax, while the next focuses only on the upper abdomen. Smaller sets make it easier to notice exactly which spatial relationships need more work.
Compare the Model With Other Anatomy Resources
A torso model is excellent for physical arrangement, but it cannot show everything. Some models omit blood vessels, nerves, connective tissues, smaller glands, or the detailed surfaces of organs. Removable parts may also be enlarged, separated, or positioned for visibility rather than exact proportional realism.
Use an atlas or labeled illustration to verify names, surfaces, subdivisions, and connections that the model simplifies. A digital three-dimensional resource may help you hide layers or change the viewpoint, while a textbook may explain functions and terminology more fully. If a model seems to place a structure differently from a reference, check whether the difference comes from the viewing angle, an anatomical variation, or a deliberate teaching simplification.
The distinction matters during study. A learner might correctly identify a model’s large, brightly colored pancreas but still need an atlas to understand its surfaces and relation to nearby vessels. Another might use a digital model to inspect a hidden structure, then return to the physical torso to reinforce its position relative to the rib cage. Different resources answer different questions, and combining them prevents one tool from carrying more detail than it was designed to provide.
Common Problems When Studying With a Torso Model
Memorizing Colors Instead of Anatomy
Color coding is helpful, but it is not universal. One manufacturer may use a bright red heart and tan liver, while another may use different colors for contrast. Identify structures by shape, position, neighboring organs, and anatomical terminology. If you can name an organ only because it is blue or green, cover the color cues with a piece of paper or study from a different view.
Assuming the Model Shows Exact Proportions
Educational models often enlarge small structures or separate organs so they can be seen and handled. That design is useful, but it means the model should not be treated as a precise map of every dimension or surface. Use it to understand arrangement, then consult a reliable reference for proportions and fine detail.
Ignoring Differences Between Individuals
Real bodies are not identical diagrams. Organ size, shape, and position can vary, and breathing or posture can alter relationships within the thorax and abdomen. A torso model presents one simplified arrangement for teaching. It is a foundation for spatial reasoning, not a claim that every person’s anatomy looks exactly the same.
Handle and Store the Model Carefully
Follow the manufacturer’s instructions for assembly, cleaning, and storage because plastics, painted surfaces, labels, magnets, pegs, and joints do not all tolerate the same treatment. In general, support removable parts with both hands, avoid forcing connectors, and keep small components in a labeled container when they are not attached.
A model used by several students can collect fingerprints and dust around seams, but aggressive solvents or abrasive cleaners may damage painted details and printed labels. Use only cleaning methods approved for that model. Store the torso where it will not be compressed, exposed to heat, or repeatedly knocked against a wall or shelf. Care protects the labels and connections that make relationship study possible.
Frequently Asked Questions
What Should I Study First on a Torso Model?
Begin with orientation, the rib cage, vertebral column, diaphragm, and major body cavities. Then add the large organs before moving to smaller or deeper structures. This gives each new organ a location and set of neighbors.
How Can I Study Organ Relationships Without Removing Parts?
Use the intact model to describe anterior, posterior, superior, inferior, medial, and lateral relationships. Rotate the torso, cover labels, and trace systems with your eyes or a pointer. Keeping the parts in place is particularly useful for studying overlap and depth.
Are Removable Organs Necessary?
No. A fixed torso can still support orientation, regional study, and spatial descriptions. Removable parts add another way to examine deeper structures and test recall, but they are not required for learning relationships.
Can a Torso Model Replace an Anatomy Textbook?
No. It is a physical spatial aid, not a complete source for microscopic anatomy, detailed pathways, variation, or physiology. Pair it with an atlas, textbook, or suitable digital resource so that visual arrangement and anatomical detail support each other.
The most effective routine is straightforward: orient the torso, map its cavities, study organs in layers, trace systems, rotate the model, and test yourself without labels. When you can describe not only what an organ is but also what lies around it, behind it, and along the same pathway, the torso model has become more than a collection of colored parts. It has become a working map of three-dimensional anatomy.
