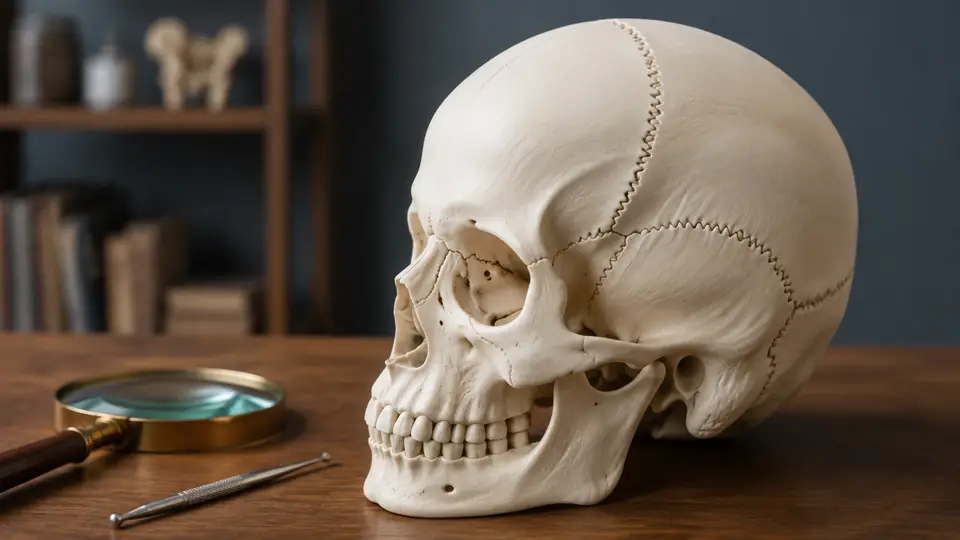
The thin lines on a skull model can look deceptively simple. A shallow groove near the top may be the sagittal suture, while a similar-looking line at the side may actually be the squamous suture or a model seam. Learning how to identify skull sutures on a model is therefore less about memorizing isolated names and more about reading the skull’s orientation, neighboring bones, and distinctive landmarks together.
Skull sutures are immovable fibrous joints that connect many of the bones of the skull. On an anatomy model, they may appear as raised ridges, recessed grooves, painted lines, or slightly irregular interlocking borders. The representation is often simplified for visibility, so the model should be treated as a three-dimensional study aid rather than a perfectly life-sized map of every anatomical variation.
Start With the Skull’s Orientation
Before naming any suture, establish which surface you are looking at. Hold the model with the face pointing forward, the large opening at the base pointing downward, and the top of the cranium facing upward. This simple reset prevents a familiar line from becoming confusing when the skull is rotated in your hands.
For example, a student examining the top of the skull may quickly spot a long midline groove and call it the coronal suture. Once the model is turned toward the front, however, the coronal suture should run across the skull from one side to the other, behind the frontal bone. Orientation gives the line a location, and location gives the name meaning.
Use these broad views as your starting map:
- Superior view: the top of the skull, where the sagittal and coronal sutures are especially important.
- Anterior view: the face and forehead, useful for the metopic, frontonasal, and facial sutures.
- Lateral view: the side of the skull, where the squamous, lambdoid, and pterion regions can be examined.
- Posterior view: the back of the skull, where the lambdoid suture forms a broad inverted-V pattern.
- Inferior view: the base of the skull, where several complex sutures meet around the temporal, sphenoid, occipital, and facial bones.
A useful habit is to identify the front, back, top, and side before touching the line with a finger. That brief pause helps separate anatomical reasoning from visual guesswork, especially when a disarticulated or rotating model has no fixed stand.
What Counts as a Suture on a Skull Model?
A suture is a boundary between adjacent skull bones. It is not simply any line molded into the plastic. Some models include seams from manufacturing, borders around removable pieces, or printed labels that can look surprisingly anatomical under bright classroom lighting.
Real sutures often have an irregular, interlocking appearance, like two rough puzzle edges pressed together. On a model, the line may be exaggerated or smoothed into a neat groove. Look for a boundary that separates recognizable bones and continues along an anatomically sensible path. A line that ends abruptly inside a bone, surrounds a removable insert, or appears identically on every component may be a construction feature instead.
Do not confuse sutures with other skull landmarks:
- Foramina are openings through which nerves and blood vessels pass. They appear as holes rather than long borders.
- Fissures are narrow openings or clefts, often found in the orbit or skull base.
- Processes are projections, such as the mastoid process or styloid process.
- Fossae are depressions, including the temporal fossa on the side of the skull.
- Articulations with the mandible, such as the temporomandibular joint, are joints but are not cranial sutures.
When a model includes a removable mandible, the separation between the mandible and temporal bone can draw the eye first. It is a real joint, but it should not be labeled as a suture. This distinction matters because skull models often place several types of boundaries within a few centimeters of one another.
The Major Sutures to Find First
Begin with the largest and most recognizable sutures. Once these are secure, smaller facial and cranial sutures become easier to place because you have a reliable map of the skull.
Sagittal Suture
The sagittal suture runs along the midline between the right and left parietal bones. On a superior view, it extends from the coronal suture toward the lambdoid suture, creating a long front-to-back seam over the crown.
Trace it with your eyes rather than jumping straight to the label. The line should stay near the center of the skull and divide the two parietal bones. If the model has a small midline bump or a series of openings nearby, do not let those features distract you. The sagittal suture is the boundary itself, not the superior sagittal sinus groove on the internal surface or a nearby parietal foramen.
Coronal Suture
The coronal suture separates the frontal bone from the two parietal bones. It crosses the skull from left to right, slightly behind the forehead, and meets the sagittal suture near the top of the cranium.
On many models, this suture looks like a broad zigzag running across the crown. A useful check is bone identity: the frontal bone lies in front of the coronal suture, while the parietal bones lie behind it. If you are looking at a side view, follow the line upward until it meets the sagittal suture. That intersection is the bregma, a landmark commonly shown on teaching models.
Lambdoid Suture
The lambdoid suture separates the parietal bones from the occipital bone at the back of the skull. From a posterior view, it forms an inverted-V or lambda-like outline, although the exact shape varies.
Turn the model so the broad occipital bone faces you. The lambdoid suture should arc across the back rather than running vertically down the center. Small accessory bones called sutural bones may appear within this region on some models or specimens. Their presence can make the border look busier, but the main lambdoid suture remains the larger boundary between the occipital and parietal bones.
Squamous Suture
The squamous suture lies on the lateral side of the skull between the squamous part of the temporal bone and the parietal bone. It curves above the external acoustic meatus, the ear canal opening, and extends forward toward the region of the pterion.
This is often where learners lose the trail. From the side, the squamous suture may look like a shallow, gently curved line rather than the dramatic zigzag seen at the top. Use nearby landmarks as anchors. Find the ear opening first, then look superiorly for the temporal bone and the boundary where it meets the parietal bone.
Important Sutures on the Face and Skull Base
Once the four major cranial sutures are familiar, shift to the front and side of the model. These smaller boundaries are easy to miss because facial bones overlap in a tight, three-dimensional arrangement.
Metopic Suture
The metopic suture, also called the frontal suture, lies between the two halves of the frontal bone during early development. On an adult skull model, it may be absent because it normally fuses, or it may be represented as a visible midline line for teaching purposes. Some models show it clearly to help learners understand the frontal bone’s developmental division.
If a model displays a vertical line down the forehead, do not automatically assume it is a manufacturing seam. Check whether it begins near the nasal region and continues toward the coronal suture in a position consistent with the frontal bone. At the same time, remember that a visible metopic suture is not present in every adult skull, so model design and anatomical variation both matter.
Frontonasal Suture
The frontonasal suture separates the frontal bone from the paired nasal bones. It sits at the bridge of the nose, just below the forehead. On a facial view, find the nasal bones first, then identify the short boundary where they meet the frontal bone.
This suture is often much less obvious than the coronal or sagittal suture. On a small model, it may be a narrow line tucked beneath the brow. A magnified classroom model may exaggerate it, while a compact skull may make it difficult to see without rotating the face toward a light source.
Internasal and Intermaxillary Sutures
The internasal suture separates the paired nasal bones along the midline. Below it, the intermaxillary suture runs between the right and left maxillae in the region of the upper jaw. The intermaxillary line may continue toward the incisive region, depending on how the model depicts the facial bones.
These sutures are easiest to identify from the front. A student may mistake the vertical groove between the nasal bones for the nasal cavity itself, but the cavity is a deeper space behind the external opening. The suture is the shallow boundary between bones on the surface.
Zygomatic Sutures
The zygomatic bone connects with several neighboring bones, producing sutures that are easier to understand as a group. The zygomaticofrontal suture lies near the outer corner of the orbit, where the zygomatic bone meets the frontal bone. The zygomaticomaxillary suture is located below the orbit, between the zygomatic bone and maxilla. The zygomaticotemporal suture continues posteriorly toward the temporal bone and contributes to the zygomatic arch.
Use the cheekbone as your anchor. Its strong, projecting shape is usually easy to recognize even on a simplified model. From there, follow each border to the neighboring bone rather than trying to memorize three separate lines without a spatial reference.
Other Sutures Commonly Shown on Models
Depending on the model’s detail level, you may also see the occipitomastoid suture between the occipital and temporal bones, the parietomastoid suture between the parietal and temporal bones, and the sphenofrontal or sphenoparietal sutures around the sphenoid region. These are particularly useful when studying the complex junction called the pterion.
Not every teaching skull shows all of these smaller sutures. Their absence does not necessarily mean the model is incorrect. Manufacturers may simplify fine boundaries to keep the main bones visible, or they may highlight only the structures named in the accompanying labeling guide.
A Reliable Method for Identifying Any Suture
When a line is unfamiliar, use the same short sequence each time. This turns identification into a process rather than a visual coin toss.
- Orient the model. Decide whether you are viewing the skull from the front, back, side, top, or base.
- Locate the neighboring bones. Ask which two bones appear to meet at the line.
- Find a landmark nearby. The orbit, ear canal, nasal bridge, zygomatic arch, or foramen magnum can provide a fixed reference.
- Trace the line. Follow it until it reaches another recognizable suture or landmark.
- Check the pattern. Compare its direction and location with an atlas or labeled diagram.
- Say the full identification aloud. For example, “The sagittal suture lies between the right and left parietal bones.”
That final sentence is more useful than repeating a name by itself. It links the suture to its location and bone relationships, which helps when the model is rotated or the label is covered during self-testing.
For practice, place removable labels or small pieces of paper over the printed names and identify five lines in sequence. A second round can begin from the opposite side of the model, because real understanding should survive a change in viewing angle.
Why Models Sometimes Make Sutures Difficult to Read
Skull models vary in scale, color, construction, and labeling. One may use contrasting colors for each bone, while another uses a single ivory surface with shallow molded lines. A disarticulated model may separate bones completely, making borders obvious, while an articulated model shows the assembled spatial relationship more realistically.
Some models deliberately exaggerate sutures so students can see them from across a classroom. Others preserve a smoother appearance that is closer to a natural skull. The line may also be interrupted by removable components, a support stand, or a painted label. When the visual information seems inconsistent, consult the model’s key before deciding that the anatomy is wrong.
Manufacturing seams deserve special attention. A seam often continues around a component in a mechanically convenient path, such as a clean circle or straight split. An anatomical suture usually follows the boundaries of named bones and connects logically with neighboring landmarks. If uncertainty remains, compare the model with a reliable skull atlas rather than relying on color or texture alone.
Common Identification Errors
Confusing the Sagittal and Coronal Sutures
The sagittal suture runs front to back along the midline. The coronal suture runs side to side between the frontal and parietal bones. Looking only at a top view can make both seem like simple grooves, so check direction and bone relationships together.
Calling Every Skull Line a Suture
Foramina, fissures, muscle markings, and assembly lines can all compete for attention. If the feature is an opening, projection, or depression rather than a boundary between two bones, it probably belongs to a different category.
Ignoring the Side of the Skull
The squamous, parietomastoid, and zygomatic sutures are much easier to identify when the external acoustic meatus and zygomatic arch are visible. A top-down view hides the very landmarks that make lateral sutures understandable.
Assuming Every Model Shows the Same Sutures
Two models may legitimately differ in how much detail they display. One may emphasize the four major cranial sutures, while another includes facial sutures and smaller temporal boundaries. Use the model’s legend and construction notes as part of the identification process.
Using Skull Sutures for Active Recall
Once the sutures are mapped, turn the model into a self-testing tool. Point to a line without looking at the label, name it, identify the bones it connects, and describe its direction. Then rotate the skull and repeat the exercise from another view.
A partner can make the exercise more realistic by asking questions such as, “Which suture lies between the frontal and parietal bones?” or “Which suture forms the boundary between the two parietal bones?” These prompts test relationships instead of simple word recognition, much like identifying a landmark during a practical anatomy session.
Pairing the physical model with a labeled atlas or digital reference can also clarify difficult areas. The model supplies depth and bone relationships, while a diagram may make small facial sutures easier to isolate. Neither resource has to replace the other, especially when the printed model labels are crowded or incomplete.
Frequently Asked Questions
How Can I Tell the Coronal Suture From the Lambdoid Suture?
The coronal suture separates the frontal bone from the parietal bones and lies toward the front half of the skull. The lambdoid suture separates the occipital bone from the parietal bones and lies at the back. Find the forehead and occipital region first, then trace the appropriate boundary.
Is the Metopic Suture Present on Every Adult Skull Model?
No. The metopic suture may be shown for educational purposes, but it normally fuses during development and is not visibly persistent in every adult skull. Model design and normal anatomical variation can both affect whether it appears.
Are Sutures Painted on an Anatomy Model Accurate?
They may be anatomically representative, but they are often simplified or emphasized for visibility. Use the model to learn the location and relationships of the sutures, then verify fine details with the manufacturer’s labeling guide or a trusted anatomy reference.
What Should I Do If a Line Looks Like a Model Seam?
Check whether it follows the boundary between two named bones, connects with nearby sutures, and matches a known landmark. If it forms a mechanically neat split or surrounds a removable component, it may be a construction seam rather than an anatomical feature.
Build the Identification From Landmarks, Not Lines Alone
The most dependable way to identify skull sutures on a model is to combine three clues: the skull’s orientation, the bones on either side of the boundary, and nearby landmarks. Start with the sagittal, coronal, lambdoid, and squamous sutures, then work outward to the facial and skull-base sutures as the model becomes familiar.
A line becomes much easier to remember when it is tied to a place and a relationship. The sagittal suture is not merely a groove on top. It is the midline boundary between the parietal bones. The coronal suture is not just a transverse zigzag. It separates the frontal bone from the parietals. That habit of locating, tracing, and explaining turns a confusing plastic surface into a readable anatomical map.
