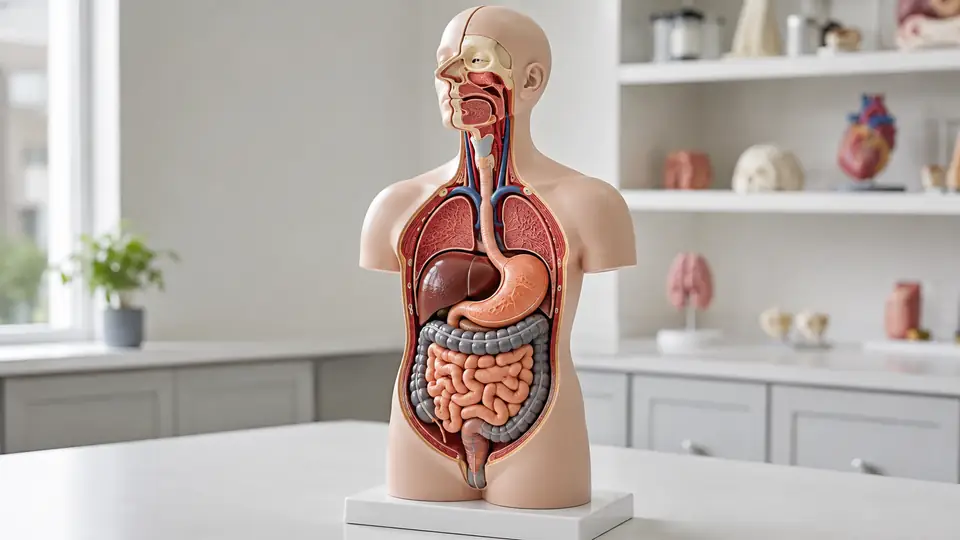
A digestive system model turns a winding tube and several tucked-away organs into something you can inspect from different angles. Instead of memorizing “stomach, intestine, liver” as a flat sequence, you can follow the route of food, locate organs by their neighbors, and test yourself by pointing to each structure without looking at a label. That is the real advantage of learning how to study the digestive system with an anatomy model: it connects names, positions, relationships, and functions in one three-dimensional scene.
Use the model as an active study tool rather than a sculpture on a desk. If you are working with a full torso rather than an isolated digestive model, life-size torso models can be especially useful for seeing how the digestive organs relate to the diaphragm, lungs, spine, and other surrounding structures. Trace the alimentary canal in order, examine the accessory organs separately, rotate the model to check posterior relationships, and repeatedly identify structures from memory. A good session should feel less like rereading a page and more like navigating a small anatomical map, with each turn leading to the next landmark.
Start With the Digestive System’s Overall Plan
Before focusing on individual organs, establish the system’s two-part organization. The alimentary canal, also called the gastrointestinal tract, is the continuous passageway that begins at the mouth and ends at the anus. The major sections are the oral cavity, pharynx, esophagus, stomach, small intestine, large intestine, rectum, and anal canal.
The second group consists of accessory digestive organs. These include the teeth, tongue, salivary glands, liver, gallbladder, and pancreas. Food does not pass through most of these organs, but their secretions or mechanical actions support digestion. That distinction is useful when studying a model because the long intestinal tube often dominates the view, while the liver, pancreas, and gallbladder sit nearby and contribute through ducts or secretions.
Try this first pass without worrying about every label. Follow the tract with a finger from the mouth to the esophagus, stomach, small intestine, and large intestine. Then identify the liver above the stomach, the gallbladder tucked beneath the liver, and the pancreas positioned posterior to the stomach in many anatomical models. If you can describe the broad layout in a few sentences, the smaller landmarks have somewhere to fit.
Use a Simple Route Sentence
Build a verbal route that matches the model: mouth, pharynx, esophagus, stomach, duodenum, jejunum, ileum, cecum, colon, rectum, anal canal. Saying the sequence while touching each region gives your eyes, hands, and memory the same job. A student studying at a kitchen table might trace this route before breakfast, while an instructor might ask a partner to interrupt and say, “Stop at the duodenum,” turning a quiet review into a quick navigation exercise.
Do not treat the route as a straight line drawn across the body. The esophagus descends through the thorax before entering the abdomen, the stomach curves beneath the diaphragm, and the small intestine occupies much of the central abdominal space. The large intestine frames much of that intestinal mass, beginning at the cecum and continuing through the ascending, transverse, descending, and sigmoid colon before reaching the rectum.
Study the Model in Passes Instead of Memorizing Everything at Once
A digestive system model can present dozens of labels in one crowded view. Trying to memorize every structure during the first session usually makes it harder to see how the major pieces fit together. Use several passes instead, with each pass answering a different question.
- First pass, orientation: Identify the front and back, top and bottom, left and right, thoracic and abdominal regions, and the broad outline of the tract.
- Second pass, pathway: Trace the alimentary canal from the mouth to the anal canal without skipping sections.
- Third pass, regional anatomy: Separate the foregut, midgut, and hindgut regions if your course uses those terms, or study the organs by their anatomical neighborhoods.
- Fourth pass, accessory organs: Locate the liver, gallbladder, pancreas, salivary glands, teeth, and tongue, then connect them to digestive functions.
- Fifth pass, relationships: Examine which organs lie anterior, posterior, superior, inferior, or lateral to one another.
During a short review, you might spend five minutes on the pathway and another five minutes locating the liver and pancreas from different angles. During a longer session, cover the labels with removable markers or your hand and ask yourself to identify each structure before checking. The point is not the exact length of the session. It is the repeated movement from seeing the answer to retrieving it.
Separate Recognition From Recall
Recognition feels deceptively easy. When the label “ileum” is printed beside a loop of intestine, the answer seems obvious, but the label is doing part of the work. Recall removes that support. Turn the model, hide the labels, point to a structure, and name it before consulting an atlas or answer key.
For example, point to the first part of the small intestine and ask, “Which segment receives material from the stomach and receives bile and pancreatic secretions?” The answer is the duodenum. Then point to the coiled middle and distal portions and distinguish the jejunum from the ileum. If the model does not clearly differentiate these sections, use an accompanying diagram rather than assuming that every coil can be identified by shape alone.
Trace the Digestive Tract From One Landmark to the Next
The model becomes much more useful when you treat it like a route rather than a collection of colored parts. Begin at the oral cavity, where teeth mechanically break down food and the tongue helps manipulate it. Continue through the pharynx to the esophagus, a muscular tube that carries swallowed material toward the stomach. From there, follow the stomach’s curved outline to the pyloric region and into the duodenum.
The small intestine is usually the most visually confusing part because its loops overlap and occupy a large central area. Study its three named sections in order: duodenum, jejunum, and ileum. The duodenum is the first segment and is relatively more fixed in position, while the jejunum and ileum form much of the coiled intestinal mass. Do not rely only on the apparent length of a loop. Use the model’s labels, anatomical references, or course materials when a boundary is not visually obvious.
Next, locate the cecum, the pouch-like beginning of the large intestine, and look for the appendix if the model includes it. Follow the ascending colon upward on the right side of the body, the transverse colon across the abdomen, the descending colon downward on the left side, and the sigmoid colon toward the rectum. This left-to-right view can feel reversed when you face a model, so keep anatomical right and left distinct from your own right and left.
A useful practice is to narrate the route as though you were guiding a visitor through a building. “The esophagus enters here. The stomach leads to the duodenum. The small intestine ends at the cecum. The colon frames the central coils.” A classmate can challenge you by naming a destination, such as the sigmoid colon, while you trace backward to the cecum. That backward movement is especially valuable because anatomy questions do not always follow the forward path.
Use Removable Parts and Openings to Study Relationships
Many digestive models include removable sections, detachable organs, or cutaway views. These features should not be used only for visual novelty. They let you inspect spaces that are difficult to see when the model is fully assembled, such as the posterior surface of the stomach, the position of the pancreas, or the interior of a hollow organ.
When a part comes off, first identify where it was attached. Then examine the exposed surface and ask what lies behind or beneath it. Removing the stomach, for instance, may make the pancreas easier to locate on a teaching model. Removing a section of the liver may reveal the gallbladder or larger vessels, depending on how that model is constructed. The exact removable components vary, so use the manufacturer’s diagram or included labeling guide instead of assuming every model shows the same structures.
Openings and cross-sections deserve special attention. A cutaway stomach may show the lumen and internal folds, while an intestinal section may illustrate the wall layers or mucosal surface. These views are helpful for understanding that the digestive tract is not merely a hollow pipe. However, a classroom model often enlarges, simplifies, or stylizes internal features. Understanding how accurate human anatomy models are can help you separate useful teaching simplifications from features that should be checked against an atlas or other anatomical reference.
Connect Structures to Their Functions
After locating a structure, attach one accurate functional statement to it. The stomach stores and mechanically mixes ingested material while beginning important chemical digestion. The small intestine is the principal site where digestion and absorption are completed. The large intestine absorbs water and electrolytes and compacts the remaining contents into feces. These short statements give each landmark a purpose without turning the model into a list of disconnected names.
Accessory organs are especially suited to this method. Follow the liver, gallbladder, and pancreas as a small functional group. A general torso is useful for seeing these organs in context, while dedicated liver anatomy models can provide a closer look when the liver itself is the focus of study. The liver produces bile, the gallbladder stores and concentrates bile, and the pancreas releases digestive enzymes and bicarbonate into the duodenum. If the model includes ducts, trace them carefully, but remember that simplified models may show only major ducts or use exaggerated colors for visibility.
Try a two-column verbal drill. For each structure, name its location first and its function second. “The gallbladder lies on the inferior surface of the liver, and it stores bile.” “The pancreas lies posterior to the stomach, and it contributes digestive secretions to the duodenum.” A student who can make both statements is building a stronger mental map than someone who can recite either location or function alone.
Practice Orientation and Neighboring Structures
Digestive anatomy is difficult partly because organs overlap in three dimensions. A model lets you rotate the view and compare relationships that a single illustration may flatten. Ask directional questions: Is the liver superior to the stomach? Is the pancreas anterior or posterior to the stomach? Which portion of the colon lies across the abdomen? Where does the esophagus enter the abdominal cavity?
Use anatomical position consistently. The model’s right side is the person’s right side, even when you are standing face-to-face with it. Place a small removable note on the model’s anatomical right and left during early sessions if orientation keeps slipping. Once the distinction becomes automatic, remove the notes and test yourself again.
Relationships also make excellent partner questions. One person points to the cecum and asks what structure may extend from it. Another points to the liver and asks which organ lies on its inferior surface. A person studying alone can write questions on index cards, shuffle them, and answer while rotating the model. Each question should require pointing, not merely reciting a definition.
Combine the Model With Diagrams and Digital Resources
A physical model shows volume and relationships well, but it may not provide every microscopic or sectional detail. A textbook or labeled diagram can clarify tissue layers, blood supply, mesenteries, or the exact boundaries between regions. A digital anatomy tool may allow you to hide layers, isolate organs, or view structures from angles that are difficult on a fixed model.
Use these resources in sequence rather than staring at all of them at once. Start with the physical model to establish location, check a diagram for terminology, and return to the model to retrieve the structure from memory. For instance, a diagram may help distinguish the ascending, transverse, descending, and sigmoid portions of the colon, while the model shows how those sections sit around the small intestine.
This combination also exposes the limits of each representation. A model may enlarge the pancreas for visibility, a diagram may separate overlapping organs for clarity, and a digital image may use colors that do not represent actual tissue appearance. Comparing the resources helps you learn which features are anatomical relationships and which are simply design choices.
Common Study Mistakes With Digestive System Models
Memorizing colors instead of structures is a frequent trap. Manufacturers use contrasting colors so the liver, stomach, intestines, and ducts are easy to distinguish, but color schemes vary between models and do not represent a universal anatomical code. Name the structure, describe its location, and state its relationship to nearby organs.
Studying only from one angle creates a fragile mental picture. A structure that seems obvious from the front may disappear behind another organ from the side. Rotate the model during every review, even if you spend only a few seconds checking the posterior view.
Assuming every boundary is visible can also lead to errors. Coiled intestinal segments may not be individually identifiable by shape alone, and some models omit small structures or simplify ducts. When the design does not support a confident identification, consult the model’s guide or a reliable anatomy reference rather than guessing.
Reading labels without self-testing produces familiarity but not reliable recall. Cover the labels, point first, and check second. Even an imperfect answer tells you more about your understanding than another passive pass through the same printed names.
Build a Short Study Routine
A repeatable routine keeps the model from becoming a decorative object. Begin with a one-minute orientation, then trace the tract, identify three accessory organs, and finish with a closed-label quiz. On another day, reverse the order by starting with the liver, gallbladder, and pancreas before tracing the intestinal route.
- Orient: Confirm anatomical right and left, anterior and posterior, and the thoracic-abdominal transition.
- Trace: Follow the alimentary canal from mouth to anal canal.
- Locate: Identify the liver, gallbladder, pancreas, salivary glands, teeth, and tongue if shown.
- Relate: Describe where neighboring organs sit in relation to one another.
- Recall: Cover labels and name structures from multiple viewpoints.
- Explain: Give one accurate function for each major structure.
Keep a short error list rather than rewriting everything you already know. If the duodenum and jejunum keep getting confused, practice that boundary specifically. If anatomical left and right cause trouble, spend one session rotating the model and naming the sides before reviewing organs. Targeted correction is more efficient than repeatedly starting from the mouth.
Care for the Model While You Study
Handle removable organs, magnets, pegs, joints, and stands gently because small attachment points can be more vulnerable than the larger molded sections. Keep detached pieces together in a labeled container or tray, especially when several organs have similar colors or shapes. A missing gallbladder or duct can turn a useful study session into a frustrating search through a drawer.
Cleaning instructions depend on the model’s materials, paint, labels, adhesives, and moving parts. Follow the manufacturer’s care guidance when available, and avoid assuming that strong disinfectants, soaking, or abrasive cloths are safe. For routine dust, a soft, dry cloth may be appropriate for some models, but the exact method should match the model’s documentation.
Frequently Asked Questions
What Should I Study First on a Digestive System Model?
Start with the overall route of the alimentary canal, from the mouth to the anal canal. Once that sequence is familiar, add the liver, gallbladder, pancreas, salivary glands, teeth, and tongue as accessory structures. This prevents the smaller labels from obscuring the system’s basic organization.
How Can I Tell the Small Intestine From the Large Intestine?
On many models, the small intestine occupies the central abdominal area as a series of coils, while the large intestine forms a broader frame around it. Learn the cecum, colon, and rectum as landmarks, but use the model’s labels because simplified shapes and proportions vary.
Should I Remove Parts While Studying?
Yes, if the model is designed for removal and you handle the components carefully. Use removal to examine attachment points, hidden surfaces, and organ relationships. Put each part back in its original position after identifying it, and follow any assembly instructions supplied with the model.
Can an Anatomy Model Show Digestion at the Microscopic Level?
Most digestive system models focus on gross anatomy, meaning organs and structures visible without a microscope. Some may include enlarged sections of the stomach or intestinal wall, but they usually do not replace histology diagrams or microscopic slides for studying cells, glands, or tissue layers in detail.
Make the Model a Map, Not a Label Display
The most effective approach is to move continuously between pathway, position, relationship, and function. Trace the tract, rotate the model, hide the labels, remove components when appropriate, and check uncertain details against a reliable diagram. The digestive system then becomes more than a sequence of names. It becomes an organized three-dimensional route, with accessory organs, ducts, and neighboring structures all contributing to the same anatomical story.
