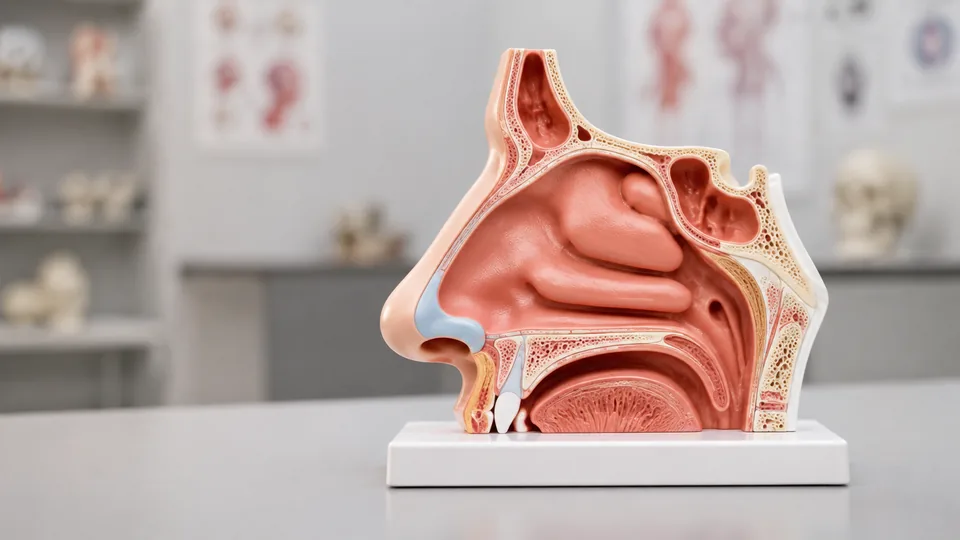
A nose anatomy diagram can look tidy on a page, yet the real structures twist, narrow, and connect in ways that are hard to grasp until they sit in front of you in three dimensions. Students tracing airflow, speech therapists explaining resonance, and instructors pointing out the pharynx all need different levels of detail. The best nose anatomy models turn those flat textbook shapes into visible cavities, folds, openings, and neighboring structures that make sense at a glance.
Common buying mistakes include choosing a model that covers too much anatomy, overlooking whether it has a stable stand, or assuming every “life-size” design shows the same structures. A basic sagittal section can work beautifully for patient education, while endoscopy practice calls for accessible nasal passages and a specialized injection trainer serves a completely different purpose. Among the nine options below, the MediTrainer Life-Size Nasal Oral Pharyngeal Anatomy Model offers the strongest balance of scale, cross-sectional detail, color coding, and display stability.
The right choice depends on whether your priority is classroom visibility, examination practice, regional context, or a compact reference that can live on a crowded desk.
Quick Answer
Best overall: The MediTrainer Life-Size Nasal Oral Pharyngeal Anatomy Model combines a 1:1 sagittal section with vivid anatomical differentiation and a stable base, making it well suited to teaching, studying, and patient-facing explanations.
Best for nasal examination practice: The Ultrassist Human Nasal Cavity Model focuses closely on the septum, turbinates, and sinus openings. Its magnetic separable construction also supports visual inspection and nasal endoscopy training.
Best premium regional model: The Kioxiuin Upper Respiratory Model adds detailed throat musculature, pharyngeal walls, and salivary glands for buyers who need more than a basic nasal cross-section.
Best Nose Anatomy Models Comparison Table
| Product | Best For | Format | Key Feature |
|---|---|---|---|
| MediTrainer Life-Size Model | Overall teaching use | 1:1 sagittal cross-section | Color coding and stable stand |
| Ultrassist Nasal Cavity Model | Examination practice | Separable nasal model | Magnetic design with accessible passages |
| Kioxiuin Upper Respiratory Model | Advanced regional study | Life-size median section | Throat muscles, glands, and pharyngeal detail |
| MedEduQuest Rhinoplasty Simulator | Injection instruction | Soft silicone trainer | Openable skin and two injection cavities |
| Faruijie Nose Cavity Larynx Model | Numbered study | Life-size regional model | Numbered structures and clear coloring |
| XINDAM Nasal Cavity Throat Model | Frequent classroom handling | Life-size PVC model | Lightweight, corrosion-resistant construction |
| LVCHEN Nasal Cavity Throat Model | Patient education | Regional cross-section | Bright coloring and numerical markings |
| Human Relief Median Section Head Model | Broader head context | Life-size relief model | Brain, spinal cord, nose, mouth, and throat |
| Human Nasal Cavity Model With Stand | Speech and swallowing lessons | Display model | Included stand for desk demonstrations |
The detailed reviews below show where each model fits, from quick desk demonstrations to focused procedural instruction.
1. MediTrainer Life-Size Nasal Oral Pharyngeal Anatomy Model: Best Overall

The MediTrainer earns the top position by making a complicated anatomical region unusually approachable. Its sagittal cross-section opens a clear side view through the nose, mouth, pharynx, and laryngeal area. Nasal conchae, vocal cords, and pharyngeal regions are visible within the same 1:1 presentation, helping learners follow how breathing, swallowing, and speech share a remarkably crowded patch of anatomy.
Color differentiation gives adjacent tissues and cavities stronger visual separation, which matters when an instructor is pointing from several feet away or a clinician is explaining airflow across a desk. The solid white stand keeps the model upright rather than forcing someone to hold it throughout a lesson. Picture a speech therapy session where one hand is already occupied with notes. A stable model that remains in view feels far less fiddly and keeps the explanation moving.
Pros
- Life-size presentation supports realistic spatial understanding
- Sagittal section exposes the nasal, oral, and pharyngeal regions clearly
- Color coding helps distinguish neighboring tissues and cavities
- Stable display stand suits desks, classrooms, and consultation rooms
- Covers breathing, swallowing, and speech-related anatomy
Cons
- Fixed cross-sectional format offers less hands-on exploration than a separable model
- Broader nose-to-throat coverage may exceed the needs of buyers studying only the nasal cavity
This is the most versatile choice for nursing instruction, biology classes, speech therapy education, and straightforward patient demonstrations. Learners needing nasal endoscopy practice should favor the Ultrassist, while advanced buyers studying deeper throat musculature may gain more from the Kioxiuin. For a clear everyday teaching model that can move from a lecture table to a clinic desk without fuss, the MediTrainer strikes the most convincing balance.
To buy this product, click here.
2. Ultrassist Human Nasal Cavity Model: Best for Examination Practice

Most models in this roundup are visual teaching aids, but the Ultrassist has a more practical focus. It depicts the nasal septum, turbinates, and sinus openings while supporting repeated visual inspection and nasal endoscopy practice. That distinction is significant. A student who understands the turbinates on a diagram can still feel disoriented when viewing a narrow passage through an instrument, where orientation is everything.
The model separates magnetically, giving instructors a quick way to expose the internal cavity and then reassemble it for practice. Magnets avoid the tiny screws and awkward clips that can interrupt a busy demonstration. In a skills lab, an instructor might open the model to identify a landmark, close it with a soft snap, and ask the next learner to locate the same area through the nasal opening. That cycle makes this model far more interactive than a fixed display.
Pros
- Shows the septum, turbinates, and sinus openings
- Supports visual inspection and nasal endoscopy practice
- Magnetic separation provides quick access to internal anatomy
- Can be reassembled for repeated teaching sessions
- Closely focused on the nasal cavity rather than the entire head
Cons
- Provides less broad oral and pharyngeal context than full regional models
- Specialized training purpose may be unnecessary for basic biology lessons
Medical students, healthcare trainees, and instructors teaching nasal examination technique are the clearest audience. Its value lies in translating named structures into an instrument-facing view, rather than serving as colorful shelf decor. General classrooms that need a large, instantly readable cross-section may prefer the MediTrainer, but focused skills programs will appreciate the Ultrassist model’s accessible and repeatable design.
To buy this product, click here.
3. Kioxiuin Upper Respiratory Model: Best Premium Regional Model

The Kioxiuin model reaches deeper into regional anatomy than the simpler nose-and-throat cross-sections. Its life-size median-cut presentation divides into two parts and shows the nasopharyngeal cavity alongside throat muscles, the pharyngeal wall, the submandibular gland, and the inner side of the sublingual gland. For an advanced class, these relationships can turn a blurry cluster of textbook labels into a coherent physical map.
At approximately 23 by 15 by 12.5 centimeters, it remains substantial enough for desk or small-group work without becoming a full head display. Imagine an otolaryngology lesson moving from nasal airflow to pharyngeal function. Instead of swapping several props, the instructor can trace the route across one regional model and point to structures such as the cricopharyngeal muscle. That richer coverage is the reason to step up to this option.
Pros
- Life-size regional presentation supports detailed anatomical study
- Two-part median-cut design provides access to internal structures
- Shows pharyngeal-wall and throat-muscle anatomy
- Includes submandibular and sublingual gland detail
- Useful for otolaryngology education and advanced demonstrations
Cons
- Its advanced regional detail may overwhelm introductory learners
- Larger investment than basic fixed cross-section models
This model makes sense for anatomy departments, advanced students, and clinical educators who regularly discuss the nose, pharynx, larynx, muscles, and glands together. A home learner memorizing a short list of nasal structures will probably get better value from a simpler numbered model. For regional depth and a more demanding curriculum, however, the Kioxiuin offers detail that the entry-level picks cannot match.
To buy this product, click here.
4. MedEduQuest Rhinoplasty Training Simulator: Best for Injection Instruction

The MedEduQuest is a specialized simulator rather than a conventional hard-plastic cross-section. Its soft silicone exterior provides a nose-shaped surface for teaching needle positioning, entry angle, injection depth, and basic dosage control. Two built-in cavities correspond to key nasal areas used in simulated filler exercises, including demonstrations related to the dorsum, tip, and hump contour.
An openable outer layer reveals internal nasal muscle structure, letting an instructor connect the point visible on the surface with the anatomy underneath. That reveal has real teaching value. A learner may mark a planned entry position, lift the skin, and see why anatomical orientation must guide the exercise. The pliable feel also makes it more suitable for repeated needle-handling demonstrations than rigid PVC models, which are meant primarily for observation.
Pros
- Soft silicone surface supports hands-on needle-positioning practice
- Two built-in cavities enable simulated filler exercises
- Openable outer skin exposes internal muscle structure
- Shows the bridge, dorsum, tip, and contour areas
- Connects surface landmarks with underlying nasal anatomy
Cons
- Specialized for supervised aesthetic-medicine education rather than general anatomy study
- Does not provide the internal nasal-cavity view found on sagittal models
This simulator suits formal rhinoplasty and aesthetic-injection instruction where qualified educators need a reusable demonstration platform. It is a poor match for someone studying turbinates, sinus openings, or airflow through the pharynx. Buyers should treat it as an educational practice aid rather than a substitute for supervised clinical training, because its strength is procedural orientation rather than comprehensive nose anatomy.
To buy this product, click here.
5. Faruijie Nose Cavity Larynx Anatomy Model: Best for Numbered Study

The Faruijie takes a familiar life-size nose, mouth, throat, and larynx format and adds number signs that support structured identification. Numbering is a simple feature, but it changes how a model works during revision. A study partner can call out a number, a student can name the structure, and an instructor can direct a room toward one landmark without repeatedly describing its position.
Its PVC construction and clear computer-matched coloring aim to keep neighboring regions visually distinct. This helps during the classic late-night study session where a flat diagram has become a fog of arrows and abbreviations. With the model turned sideways, the learner can follow the nasal cavity backward toward the throat, then compare that spatial route with course notes. The life-size format keeps those relationships grounded in human proportions.
Pros
- Numbered structures support quizzes and guided instruction
- Life-size design presents realistic regional relationships
- Displays the nasal cavity, oral cavity, throat, and larynx
- Clear coloring helps separate adjacent anatomical areas
- PVC construction suits routine educational handling
Cons
- Fixed construction offers less interaction than separable models
- Broad regional coverage provides less nasal specialization than the Ultrassist
Students who learn through labeling drills and educators who want quick reference points should place this model high on their list. The numbers are especially useful during tutoring, oral review, and small practical exercises. Buyers seeking procedural practice should look elsewhere, yet for straightforward identification and regional orientation, this is a sensible middle-ground choice without the complexity of an advanced two-part model.
To buy this product, click here.
6. XINDAM Human Anatomical Nasal Cavity Throat Model: Best for Classroom Handling

The XINDAM model keeps its mission uncomplicated. It presents the main structures of the nasal cavity and throat at life size in lightweight PVC, giving teachers a physical reference that can be carried around a classroom without hauling a bulky full-head model. The material is described as corrosion resistant and strong, practical qualities for an aid that may pass through dozens of hands.
Its straightforward presentation suits the moment when a biology teacher wants to pause beside a student’s desk and show where the oral and nasal pathways sit in relation to the throat. Life-size scale makes the demonstration more intuitive than an enlarged novelty model, while the light build reduces the clumsy thud associated with heavier lab pieces. It is geared toward presentation and general study rather than intricate procedural work.
Pros
- Life-size design shows the principal nasal and throat structures
- Lightweight construction makes classroom movement easier
- PVC material is described as corrosion resistant
- Suitable for patient education and anatomical study
- Simple presentation remains accessible to introductory learners
Cons
- Listing information does not specify removable components
- Less specialized detail than models made for nasal examination training
The XINDAM is best viewed as a durable everyday teaching prop. It fits general science rooms, introductory anatomy courses, and offices that need a life-size explanation aid without advanced moving parts. Learners working toward detailed nasal-cavity identification may prefer a numbered or separable option, but institutions prioritizing portability and straightforward regional anatomy should find this format practical.
To buy this product, click here.
7. LVCHEN Human Nasal Cavity Throat Anatomy Model: Best for Patient Education

The LVCHEN emphasizes immediate visibility. Its cross-sectional presentation covers the nasal cavity, oral cavity, pharynx, and larynx, with bright painted regions and numerical markings intended to simplify observation and explanation. In a consultation, that clarity matters more than having dozens of detachable pieces. A person can see the route being discussed without first learning how to assemble the model.
Matte PVC keeps the construction lightweight, while the painted surface gives the model a bold, high-contrast look. Picture an educator explaining why the nasal and oral passages converge farther back in the head. One finger can trace each route across the model while the listener follows the colored boundaries, a much more tangible exchange than pointing at a tiny screen. Its focus remains broad regional understanding rather than microscopic detail.
Pros
- Displays the nose, mouth, pharynx, and larynx together
- Bright painting supports quick visual recognition
- Numerical markings assist explanation and study
- Lightweight matte PVC is easy to move between rooms
- Well suited to basic patient and student education
Cons
- Fixed regional view cannot support instrument-based nasal practice
- Does not offer the deeper muscle and gland detail of premium models
Choose the LVCHEN for approachable demonstrations in clinics, tutoring spaces, or introductory courses. Its strongest quality is that viewers can understand the broad pathway quickly, without wrestling with loose pieces. Advanced anatomy programs may outgrow the level of detail, while buyers who want a clean visual aid for repeated explanations will likely appreciate its uncomplicated format.
To buy this product, click here.
8. Human Relief Median Section Head Model: Best for Broader Head Context

This relief model pulls the camera back, so to speak. Along with the nasal and oral cavities, it shows the brain, spinal cord, and throat cavity in a median section of the head. That wider context helps students understand where the nose sits relative to the cranial cavity and upper airway, relationships that disappear when studying an isolated nasal piece.
The head relief measures about 10 by 8 by 1 inches and is mounted on a base measuring roughly 13 by 9 by 1 inches. Its slim, panel-like construction suits a lab wall area, demonstration table, or office shelf where a deep freestanding model might feel awkward. During a health-science lesson, an instructor can move from brain anatomy down through the nasal and oral regions without changing aids, preserving the visual thread.
Pros
- Places nasal anatomy within a complete head section
- Also depicts the brain, spinal cord, mouth, and throat
- Life-size median format supports regional orientation
- Mounted base provides a ready-made display format
- Useful across general health and anatomy lessons
Cons
- Relief construction offers less three-dimensional access than a separable model
- Nasal structures share space with broader head anatomy, reducing specialization
This is a strong pick for students who keep asking, “Where does that sit in the whole head?” It works especially well for integrated anatomy teaching, where the brain, airway, mouth, and neck appear in the same lesson. Dedicated ENT trainees will want more internal nasal detail, but general science classrooms can gain a clearer regional story from this broad, mounted view.
To buy this product, click here.
9. Human Nasal Cavity Model With Stand: Best for Speech and Swallowing Lessons

This model is presented as a teaching aid for speech, swallowing, and nasal-cavity education, with a stand that keeps it visible during a demonstration. That stationary setup can be surprisingly useful. A speech therapist may need to gesture, write, or demonstrate mouth position while discussing how the nasal cavity relates to resonance, so a model that stays upright frees both hands.
Its educational focus centers on nasal boundaries, key landmarks, and the mechanics discussed in speech and swallowing instruction. The listing does not provide the same precise scale or component details available for several higher-ranked models, so buyers should approach it as a general display aid rather than assume advanced disassembly or procedural capability. For a desk, therapy room, or compact classroom station, the supported presentation remains its clearest advantage.
Pros
- Stand supports hands-free desk and classroom demonstrations
- Geared toward nasal-cavity education
- Useful for explaining speech and swallowing relationships
- Suitable for therapy and general biology settings
- Compact display format can remain ready between lessons
Cons
- Listing details do not confirm scale or removable components
- Less clearly documented anatomical coverage than the top-ranked models
This option makes the most sense for buyers who value a ready-to-view model and do not need instrument practice or advanced regional dissection. The included stand gives it an edge over loose models in a small office, where picking up and repositioning a teaching aid becomes tiresome. Buyers requiring verified life-size proportions or named fine structures should choose a model with more complete specifications.
To buy this product, click here.
How to Choose the Best Nose Anatomy Model
Match the Model to the Lesson
Start with the question the model must answer. A middle-school teacher explaining airflow needs a clean nose-to-throat cross-section, while a medical skills instructor may need accessible turbinates and sinus openings. Rhinoplasty training is a separate lane altogether, requiring a pliable surface and visible tissue relationships. Buying the most complicated model can create more visual noise than insight if the lesson is fundamentally simple.
Think through a real teaching moment. If six students will gather around a lab table, color separation and life-size proportions may matter most. If one learner will practice orienting an endoscope, a fixed side section will quickly reach its limit. The intended activity should shape the purchase before appearance or shelf appeal enters the conversation.
Scale and Viewing Distance
Life-size models help learners understand realistic spacing, especially through the nose, mouth, and pharynx. They also fit comfortably on desks and inside storage cabinets. A room-wide lecture may demand strong colors and broad landmarks because tiny structures fade from view across several rows, while close tutoring allows finer detail to shine.
Dimensions deserve attention when they are supplied. A wide base can stabilize a model but consume scarce bench space, and a slim relief panel may store more easily than a deep three-dimensional head. Measure the intended shelf or cabinet rather than discovering later that the model’s stand sticks out like an elbow in a crowded hallway.
Fixed, Separable, or Soft Silicone
Fixed cross-sections are quick to understand and have fewer pieces to lose. They work well for repeated pointing, labeling, and patient-facing explanations. Separable models expose internal surfaces and encourage active exploration, though they require learners to reassemble parts correctly and generally demand more careful handling.
Soft silicone trainers address surface-based procedural instruction. Their pliable texture supports needle handling, while rigid PVC is better suited to enduring display and identification. These formats are not interchangeable. A silicone external nose will not replace a sectional nasal-cavity model, and a hard PVC section cannot simulate tissue entry.
Labels, Numbers, and Color Coding
Numbered structures can turn a display model into a quiz tool. Students can cover the reference key, identify each number, and check their answers without attaching temporary labels. Numbers also help instructors keep everyone’s attention on the same small landmark during a lively class.
Color coding should create visible boundaries without becoming the lesson itself. Anatomical model colors often serve educational differentiation rather than representing literal tissue color. Learners should use them to separate structures, then connect those regions with course materials and instructor guidance.
Stand Design and Portability
A stable stand matters in clinics, therapy rooms, and busy classrooms. The model remains at a predictable angle while the teacher gestures or handles another aid. Lightweight construction is helpful for room-to-room movement, but the base should still resist tipping during ordinary pointing and close observation.
Mounted relief models trade depth for easy display. They can be excellent for broad head context and compact storage, while freestanding sections usually provide a more convincing three-dimensional sense of the airway. Choose the style that fits the physical teaching space rather than treating the base as an afterthought.
Detail Versus Clarity
More structures do not automatically produce better learning. A first-time anatomy student can lose the nasal cavity inside a busy landscape of glands, muscles, nerves, and vessels. A simpler sagittal model keeps the route from nostril to pharynx visually clean, which may be exactly what the syllabus requires.
Advanced regional education benefits from added musculature, gland anatomy, and removable sections. Those details support richer discussion, yet they carry value only when the learner has the background to interpret them. Match anatomical density to the course level, and the model will feel illuminating rather than crowded.
Best Nose Anatomy Models FAQ
What Structures Should a Good Nose Anatomy Model Show?
For general study, look for the nasal cavity, nasal septum or median division, oral cavity, pharynx, and surrounding airway relationships. More specialized models may show the turbinates, sinus openings, larynx, glands, or pharyngeal muscles. The necessary structures depend on whether the goal is basic orientation, advanced regional anatomy, or examination practice.
Is a Life-Size Nose Model Better Than an Enlarged Model?
Life-size models provide realistic spatial relationships and fit comfortably on a desk. Enlarged models can make small landmarks easier to see in group teaching, but scale must be clearly documented by the seller. For individual study and clinical explanations, a 1:1 model often offers the most practical balance.
Are Removable Parts Necessary?
No. Fixed models are excellent for fast demonstrations and tend to be simple to store. Removable or separable parts become valuable when learners need to inspect hidden surfaces, compare internal structures, or practice orientation through an opening. The Ultrassist model is especially relevant where repeated access to the internal nasal cavity matters.
Can a Nose Anatomy Model Be Used for Patient Education?
Yes, a clear cross-sectional model can help an educator explain basic anatomical locations and pathways. It should remain a visual aid rather than a diagnostic tool. Bright differentiation, a stable base, and uncluttered anatomy are usually more useful in a short explanation than highly advanced detail.
Which Model Is Best for Speech Therapy Education?
A sagittal model showing the nasal cavity, oral cavity, pharynx, and laryngeal region provides useful context for discussing resonance, breathing, speech, and swallowing. The MediTrainer offers broad life-size coverage, while the Human Nasal Cavity Model With Stand emphasizes a hands-free format for therapy-room demonstrations.
Can These Models Be Used to Practice Nasal Endoscopy?
Only a model specifically described for nasal examination or endoscopy practice should be selected for that purpose. The Ultrassist is the relevant choice in this roundup because its listing identifies visual inspection and nasal endoscopy practice as intended uses. Standard fixed PVC cross-sections are educational displays rather than procedural trainers.
How Should an Anatomy Model Be Cleaned?
Follow the manufacturer’s care directions whenever they are available. For many rigid educational models, gentle dusting and a lightly damp soft cloth are safer than harsh solvents or abrasive scrubbers, which may affect painted surfaces. Silicone trainers may require different care, especially after simulated procedural exercises.
Does a Nose Model Replace Textbooks or Supervised Instruction?
No. A physical model improves spatial visualization, but it cannot provide the terminology, variation, physiology, or guided correction found in formal course materials. Procedural simulators should be used within appropriate supervised education, particularly where needles or examination instruments are involved.
Final Verdict
The MediTrainer Life-Size Nasal Oral Pharyngeal Anatomy Model is the strongest overall choice among these nine models. Its 1:1 sagittal section, color differentiation, broad upper-airway coverage, and stable stand make it useful across classrooms, speech therapy education, clinics, and individual study. It presents enough detail to remain useful without turning a basic explanation into a maze of tiny structures.
More specialized buyers have compelling alternatives. The Ultrassist Human Nasal Cavity Model is the clear pick for visual inspection and nasal endoscopy practice, thanks to its focused internal anatomy and magnetic separable design. Advanced regional study favors the Kioxiuin Upper Respiratory Model, while supervised aesthetic-injection education calls for the soft silicone MedEduQuest Rhinoplasty Training Simulator. Before choosing, identify the exact lesson, viewing distance, and level of interaction required. A model that fits those three factors will spend more time teaching and less time gathering dust on a shelf.
